1
Heater Bloc’s Guide to
Building a Tent-Safe Copper Coil
Alcohol Heater
Caring for others is hot, actually.
Updated November 2021 - Email: HeaterBloc@Gmail.com - Twitter: @HeaterBloc
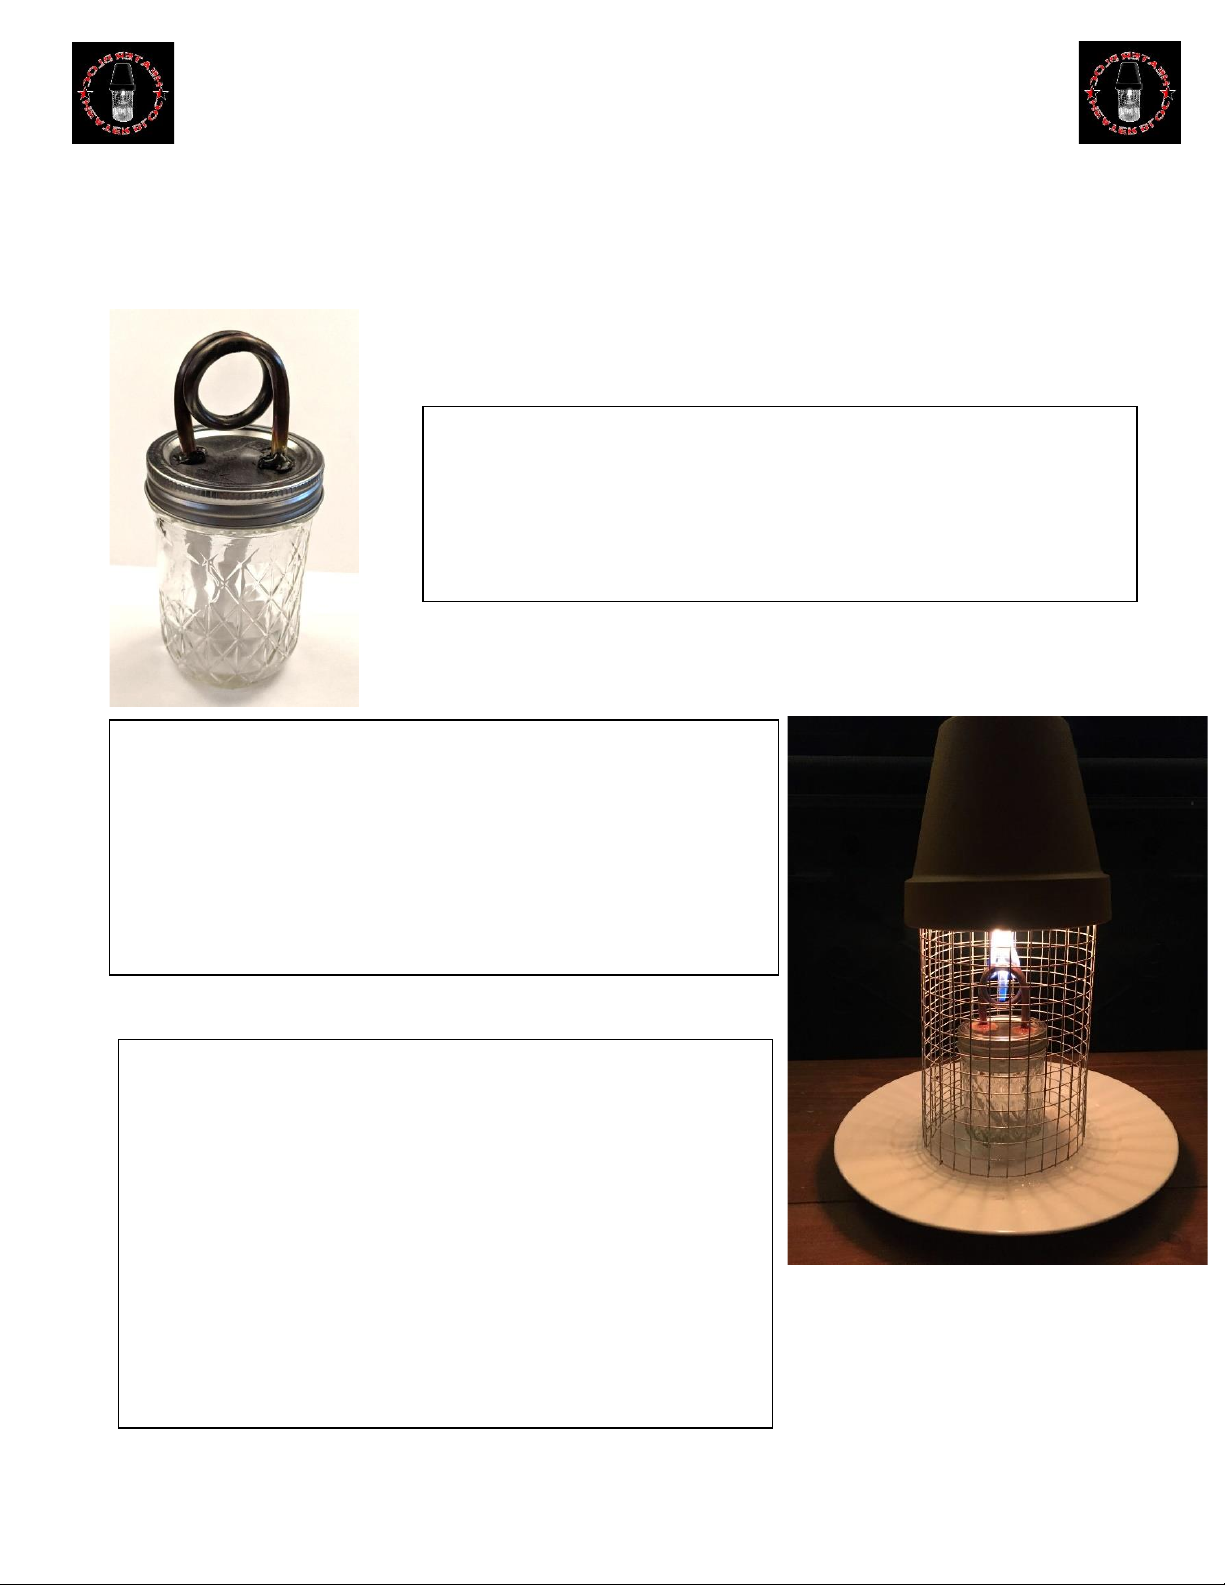
Copper Coil Alcohol Burners are:
Great for small enclosed spaces like tents or a small room
Safe to use indoors
Bad for outdoor use – the flame blows out easily
Can be used for heating or cooking.
(Sometimes called an Alcohol Jet Burner)
A complete heating kit will include:
An Alcohol Burner
A Safety Enclosure
A few lighters (preferable the long stemmed kind)
A Gallon of fuel
Tissue or paper towels to clean the burner coil
Optional: a second, smaller, wire mesh cylinder for cooking and
a milk crate to keep it off the floor
Table of Contents:
How It Works……………………………………………page 2
Heater Safety…………….…………………….……… page 3
Carbon Monoxide Safety………………………….page 4
Fuel Info…………………………………………………..page 5-6
Parts and Costs…………………………………………page 7-8
Building Copper Coil Burner……………………..page 9-14
Building Safety Enclosure………………………….page 15-18
Maintenance…………………………………………….page 19
Printable Mini-Fliers………………………………...page 20

2
How do they work?
The burner uses nothing but fumes from the alcohol fuel. What makes alcohol so dangerous to burn is the fact that it’s so
incredibly flammable. This design mitigates that danger and actually uses it to our advantage. Alcohol fumes or vapors from
the liquid fuel in the jar collect in the copper pipe and when the pipe is heated, the fumes expand and are forced out a tiny
hole at the bottom of the copper loop (the fume or jet hole). These fumes combust as soon as they exit and hit the open
flame which then heats the top of the copper loop. It’s creates a constant cycle of vaporized fumes being forced out of the
hole and then combusting.
The alcohol fumes will burn until the flow is interrupted by tipping the burner sideways or blowing it out like a candle. This
adds extra safety as they will go out automatically if they tip over. The jar is sealed, making them spill proof, as well.
Is alcohol safe to burn indoors?
Yes, alcohol burns very clean and is safe to use indoors. There are more details on this in the “Fuel” section on pages 5-6.
The recommended fuels are Isopropyl or Ethanol Alcohol (most commonly found as rubbing alcohol or liquid hand
sanitizer). A 6-8oz. Jar of alcohol like we use in this design can burn for 5-6 hours. It’s also safe to cook over, so you can
roast marshmallows or use a frying pan or pot to cook over the flame.
How do you light it?
The copper coil has to be heated until the fumes expand enough to start flowing out the tiny hole at the bottom of the
copper loop so they can combust.
Basically, hold a lighter (or other open flame like another lit alcohol burner) against the copper near the fume hole until you
see the flame start to grow larger. This can take 10-30 seconds depending on how cold the copper is.
The easiest way to light the burner is to first turn it completely upside down for a few seconds and fill the copper loop with
alcohol fuel. When you put it upright the alcohol will drain back into the jar but this leaves extra fumes behind and its easier
to light.
Note: If the flame goes out, but the copper is still hot, it can be re-lit almost instantly.
If you are using the same 1/2 inch wire mesh that we use in our design, you can reach a long-stemmed “grill lighter”
through the holes in the wire to light or re-light the burner without moving any part of the enclosure.
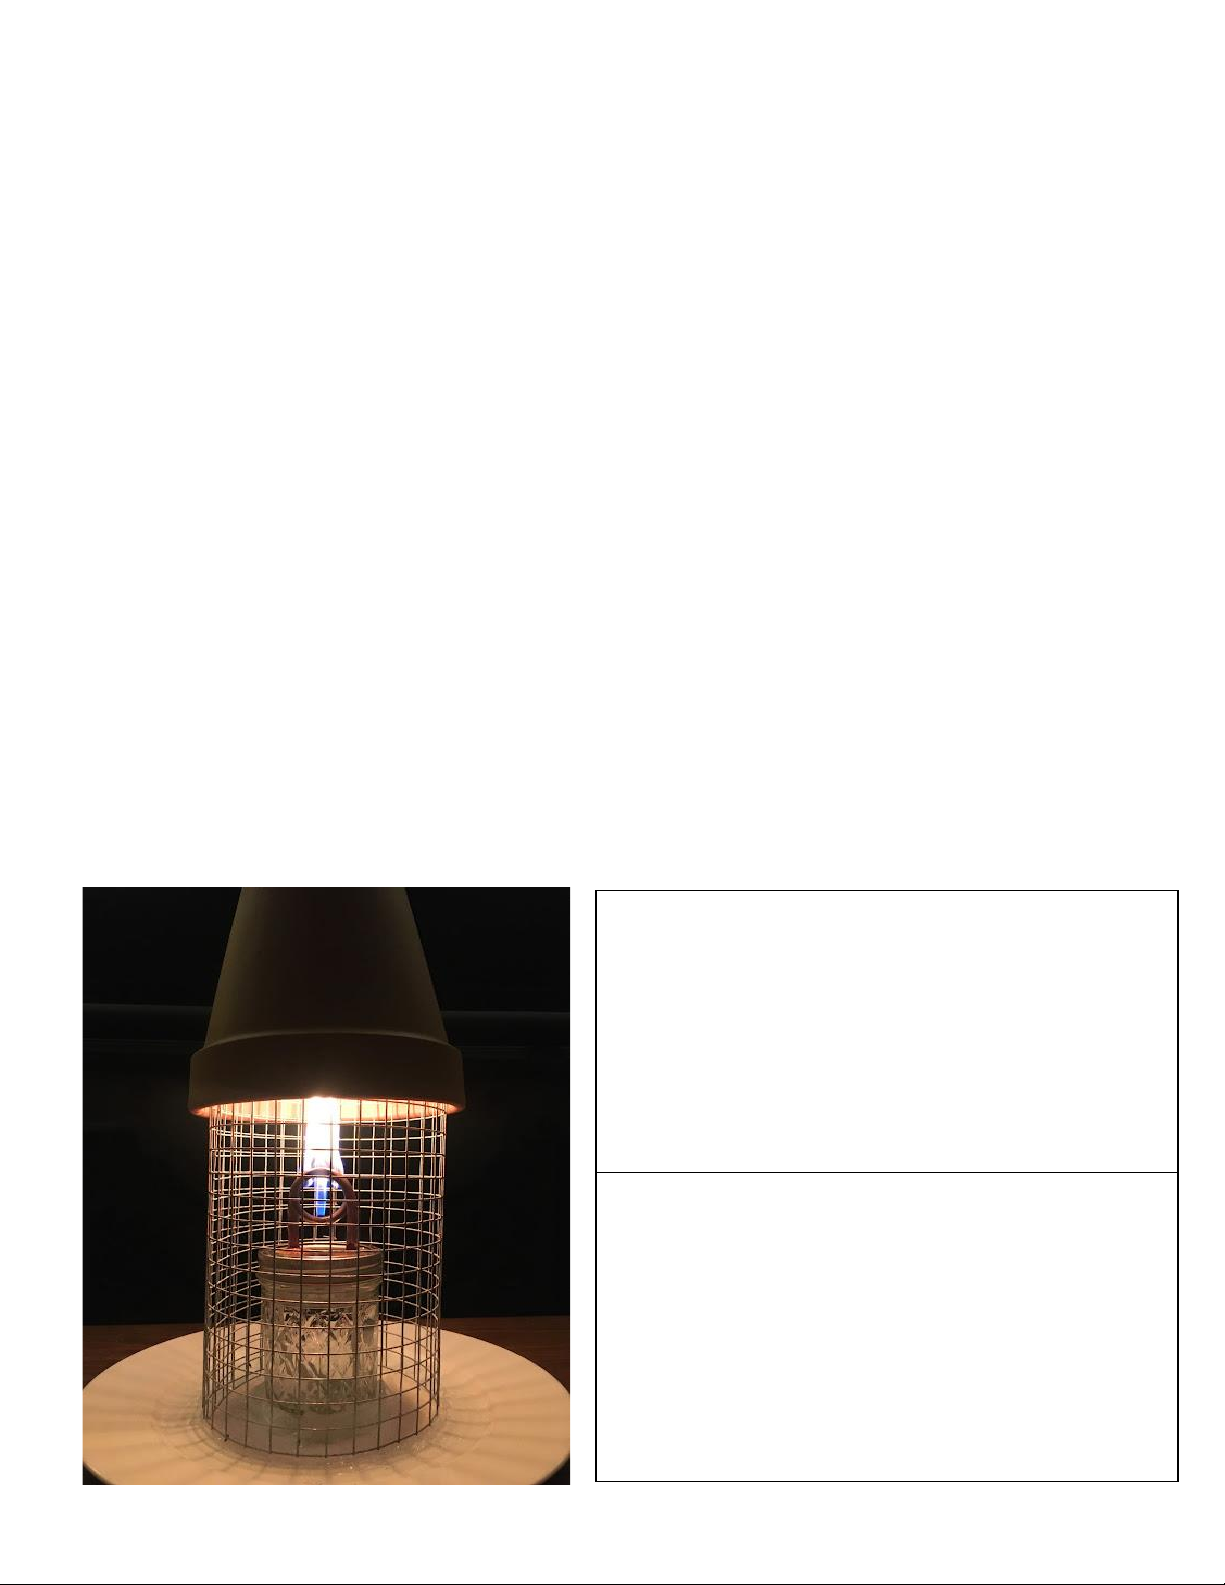
Why does the heater need the safety enclosure?
This design is intended for tents and similar structures. Open flames can burn a tent wall or start other things on fire in an
enclosed space. The jar needs a stable surface in a tent that is often full of bedding or might have an uneven floor. Stability
is provided by the heavy dinner plate on the bottom that acts as a weighted, flat base. The wire mesh cage ensures that the
burner has a steady supply of oxygen for safety and keeps things from brushing against the open flame and igniting,
accidentally. It also stays cool to the touch. The Terra Cotta pot on top helps contain and control the open flame and also
heats up to provide efficient, radiant heat.
If you have the burner sitting on steady flat surface like a table inside a building and there is nothing flammable around it
and there is no danger of it tipping over or pets disturbing it or getting burned and you promise not to burn yourself playing
with the flames too much… then you don’t need an enclosure. Although, the Terra Cotta pot does help radiate the heat to a
smaller area around the burner if you are using it for heat in a power outage or emergency situation.
3
-Heater Safety-
The Heater needs to be set-up in a flat stable place near the center of the tent or structure with nothing immediately
above it. The flame is mostly contained but can still flicker out of the vent at the top of the Terra Cotta pot.
It should not be left burning unattended. It will extinguish automatically when it runs out of fuel or is tipped over, but it’s
still an open flame and still shouldn’t be left unattended. We know this will probably happen anyway, people are cold and
tired. Just be careful.
Your extra fuel should be stored away from the burner itself. If you can put it in another tent or location entirely, that’s
best, but if not make sure the cap is tight and put it as far from the alcohol burner as possible.
The heater can be left to burn for hours without any issues as long as you respect which parts get very hot. It can also be
used more efficiently by doing a short 15-30 minute burn, then blowing it out and letting the Terra Cotta contain and
radiate heat for about 15 minutes before relighting it.
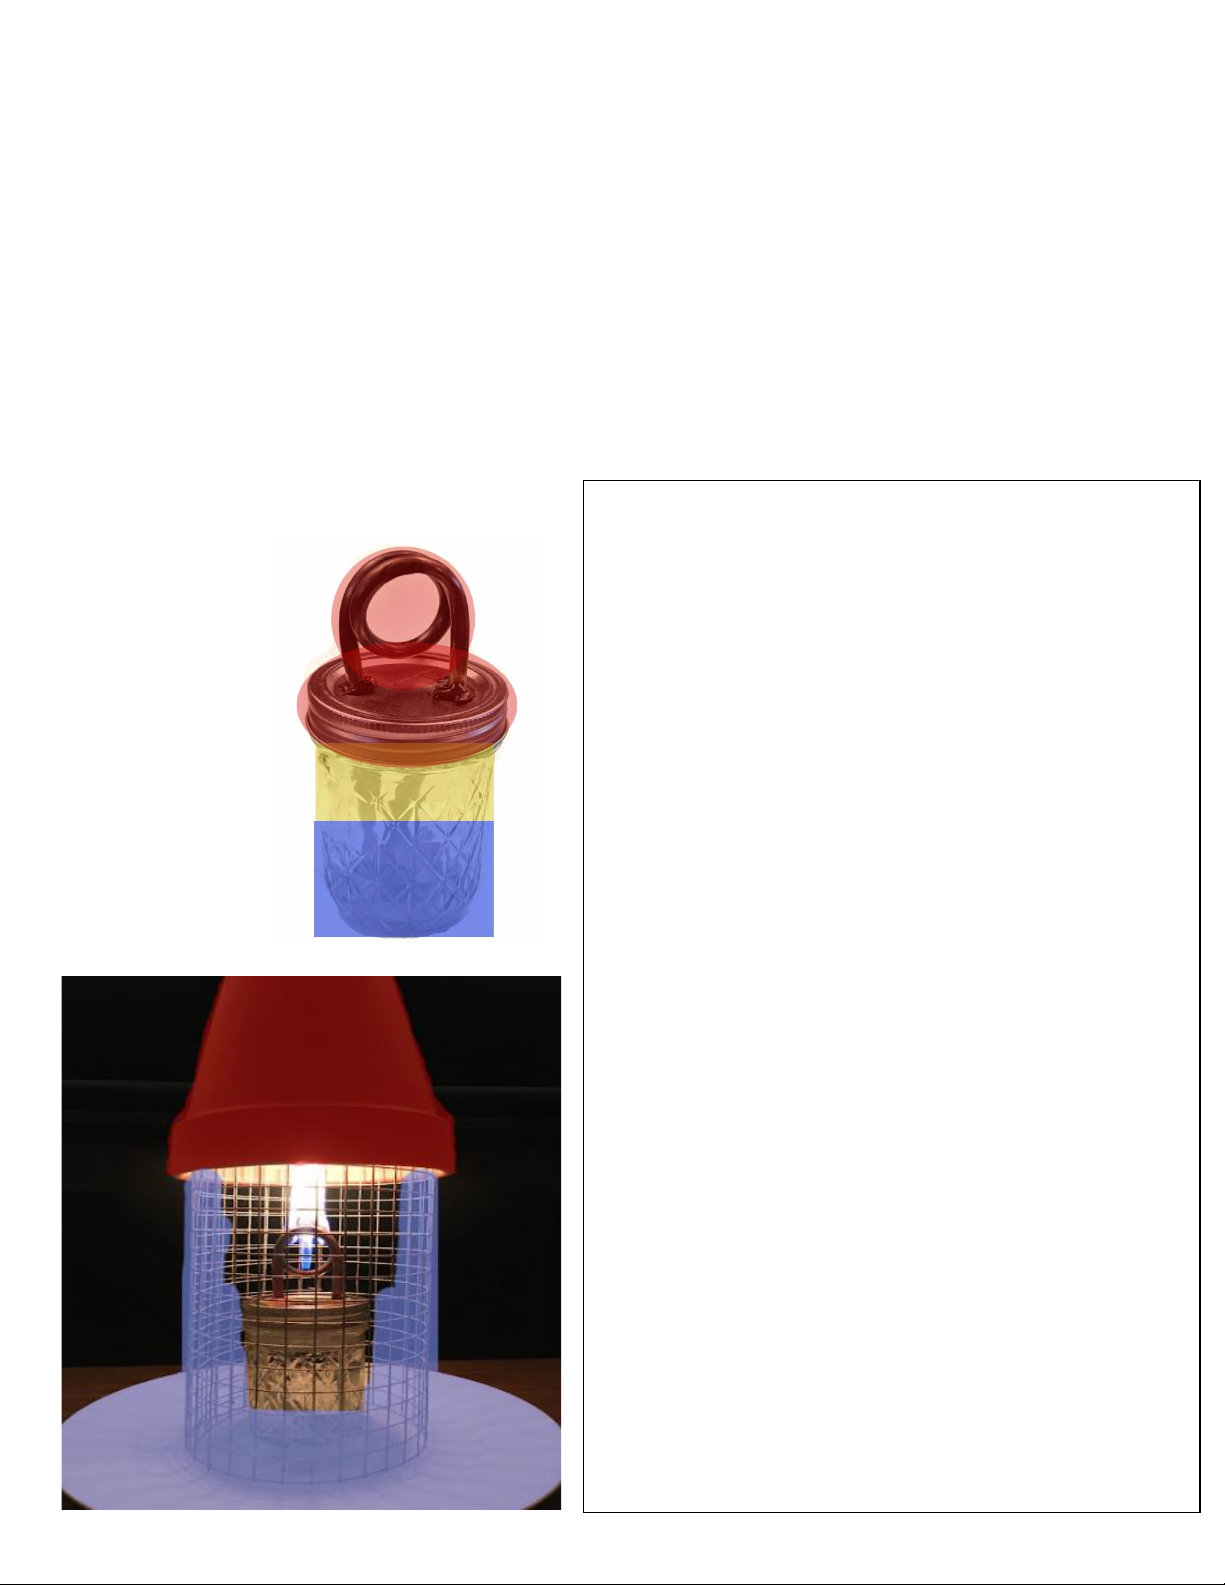
Heat Zones:
HOT:
The metal Jar Lid and Terra Cotta Pot will get very hot. The
Terra Cotta will heat up like an oven dish to a few hundred
degrees. Touch it only with proper padding. OR simply do not
touch either of these parts for 10-15 minutes after putting out
the flame.
The copper loop gets very hot but cools very quickly. It will only
stay hot for about 2 minutes after which it will be cool enough to
touch.
WARM:
The Jar itself will get very warm or even hot as it picks up heat
form the metal lid but cools down in about 5 minutes. However,
it only heats up where there isn’t fuel. The liquid alcohol will act
as an insulator and the glass around it won’t get hot at all. The
bottom of the jar will stay cool.
COOL:
The wire frame stays cool to the touch. You can use it to
carefully pick up and move the Terra Cotta cap if needed.
The Porcelain Plate used as a base stays completely cool and
can be used to carefully move around the hot heater unit if
needed.
____________________________________________________
We have done some testing on whether the hot copper burner
poses a hazard after it goes out by keeping the hot copper part in
contact with a variety of flammable paper types and alcohol
fumes immediately after extinguishing the flame. Nothing ignited
or smoldered. The burner appears to cool too quickly. As long as
nothing touches the open flame, the risk of starting a fire is very
low. It can still burn your skin right after the flame goes out,
though.
4
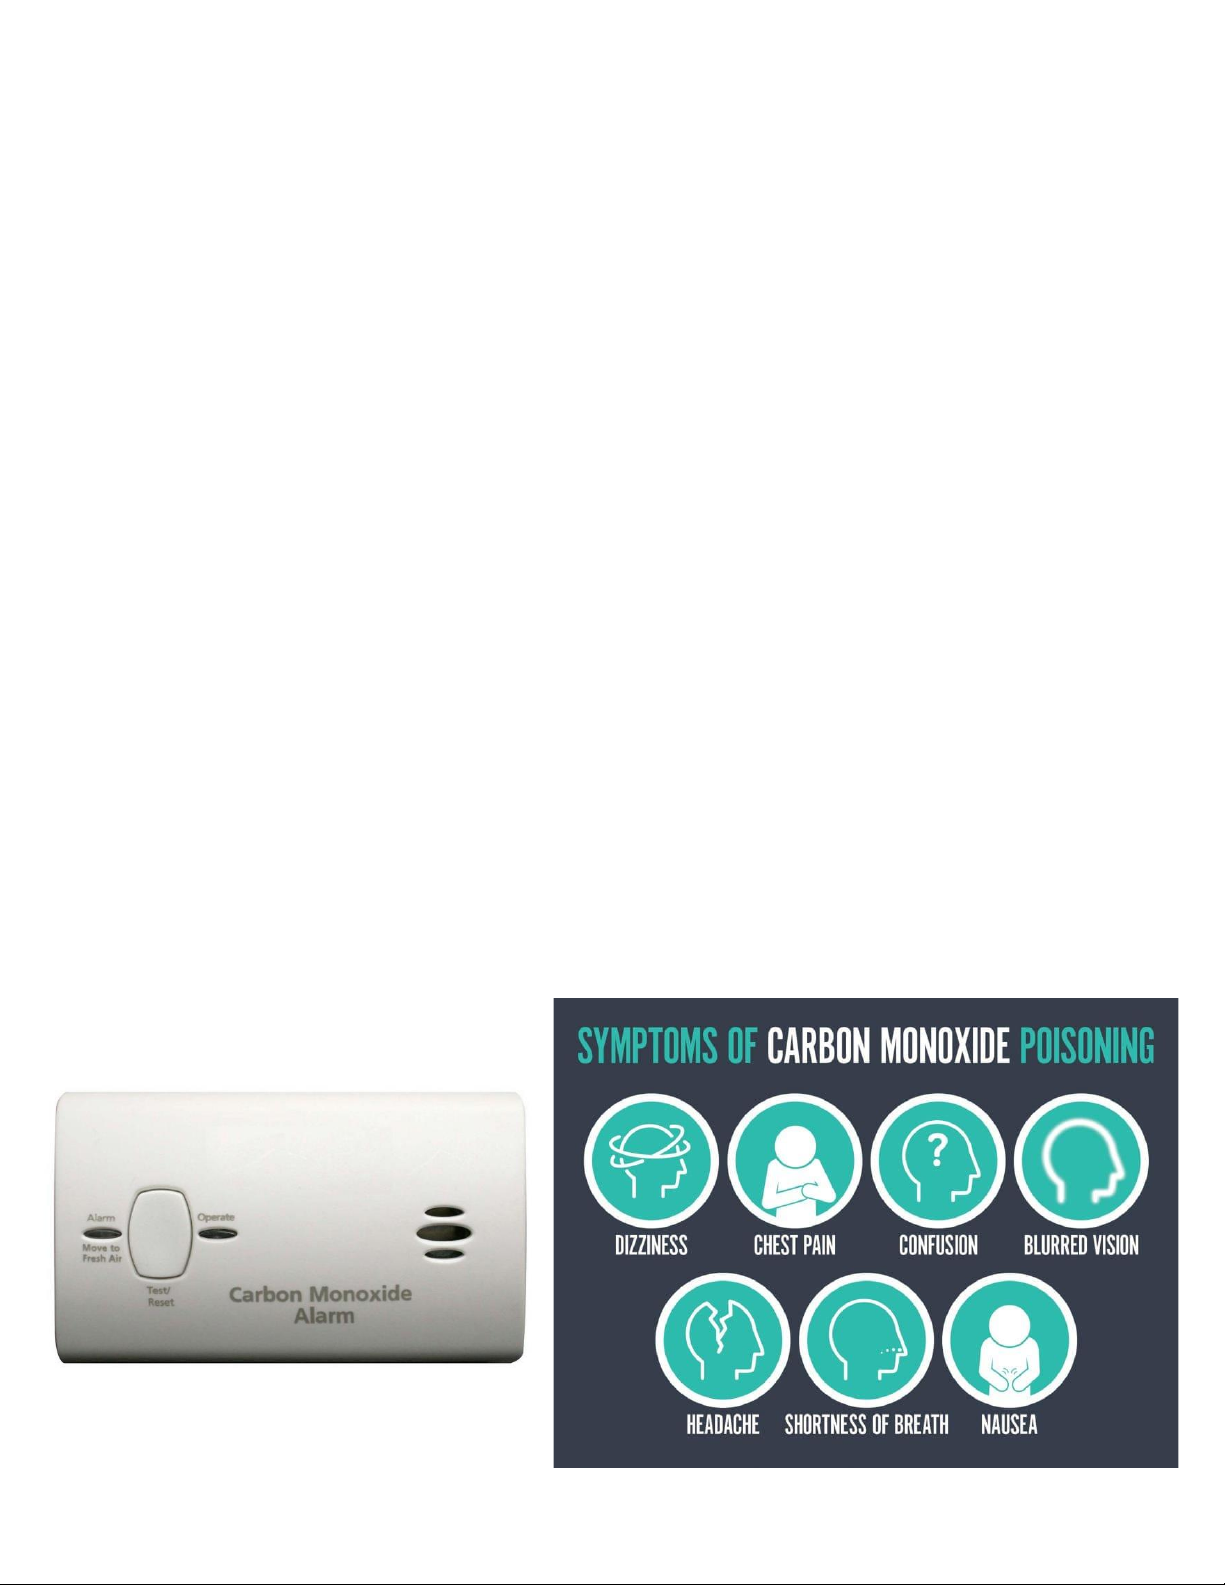
-Carbon Monoxide Safety-
A very common and important question people ask is “Do alcohol burners produce dangerous amounts of Carbon
Monoxide (CO), especially in small enclosed spaces?”
In a word, No, Carbon Monoxide (CO) is not a significant danger from alcohol burners or stoves, because alcohol does not
produce CO as a byproduct of burning, unlike most other fuels, but the more you know about it the better you can mitigate
any possible danger.
Carbon Monoxide is an odorless and invisible gas that is given off during combustion. The only way to detect Carbon
Monoxide is with a small, battery powered CO detector. Carbon Monoxide can poison you by replacing the oxygen in your
blood leading to flu-like symptoms that starts with headaches, fatigue, vomiting, and blacking out and can culminate in
death fairly quickly at very high CO concentrations. When you burn things that contain carbon like natural gas, propane,
gasoline, kerosene, oil, coal, or wood, it can give off CO. With proper ventilation the CO will usually dissipate harmlessly in
the air.
This is why it’s a bad idea to burn a propane or kerosene lamp or stove or to burn small wood fires in an enclosed area like a
tent and why you need to be careful around propane gas stoves and grills, gas generators, smoldering wood fires lit indoors,
and a car left running in a garage. Even cigarettes produce a bit of CO. The less oxygen the fire has to properly combust, the
more CO it is likely producing. Proper ventilation is the key to safety and why some things should only be burned outside.
It’s important to remember that ANY flame is capable of creating Carbon Monoxide if it doesn’t have sufficient oxygen
for combustion. However, alcohols are much simpler chemically and not derived from petroleum. Alcohol fuels combust
completely and burn more cleanly than other fuels. A copper coil “jet” heater will simply stop burning the alcohol fumes
without sufficient oxygen because there is no other fuel or wick to maintain the combustion. Also, the only byproducts of
pure ethanol when burned are Carbon Dioxide (CO2) –note the 2 there, CO2 is not CO—and Water.
While tents breathe well, there are rare cases where it could be dangerous. For example, an ice storm coating the outside
of a tent (or cabin) could create a situation where there is inadequate oxygen inside the enclosure and anything burning
would be stifled and would not combust properly. Alcohol is one of the safest fuels to use, but there is always a small risk of
CO with any open flame. If you are concerned, please make sure to have a CO detector nearby and always be mindful of
ventilation and oxygen levels.
5
-Fuel-
Isopropyl Alcohol:
Most rubbing alcohol isopropanol-based. You’ll see it listed as “Isopropyl Rubbing Alcohol” and these are readily available
at most any grocery store or pharmacy and even most gas stations stocked near medical or cleaning supplies. Isopropyl
alcohol is poisonous when consumed and often has additives to make it bitter so people won’t drink it and kill themselves.
The hand sanitizer is often given out free, by the gallon, to humanitarian organizations.
Isopropyl alcohol burns with a warm yellow flame and a tiny bit of black soot from the additives burning off. It produces a
lot of heat, but is easy to put out.
The higher the alcohol content the better it will burn (but they all work very well). The percentage listed on the bottle that
isn’t alcohol is mostly water and a few tiny additives.
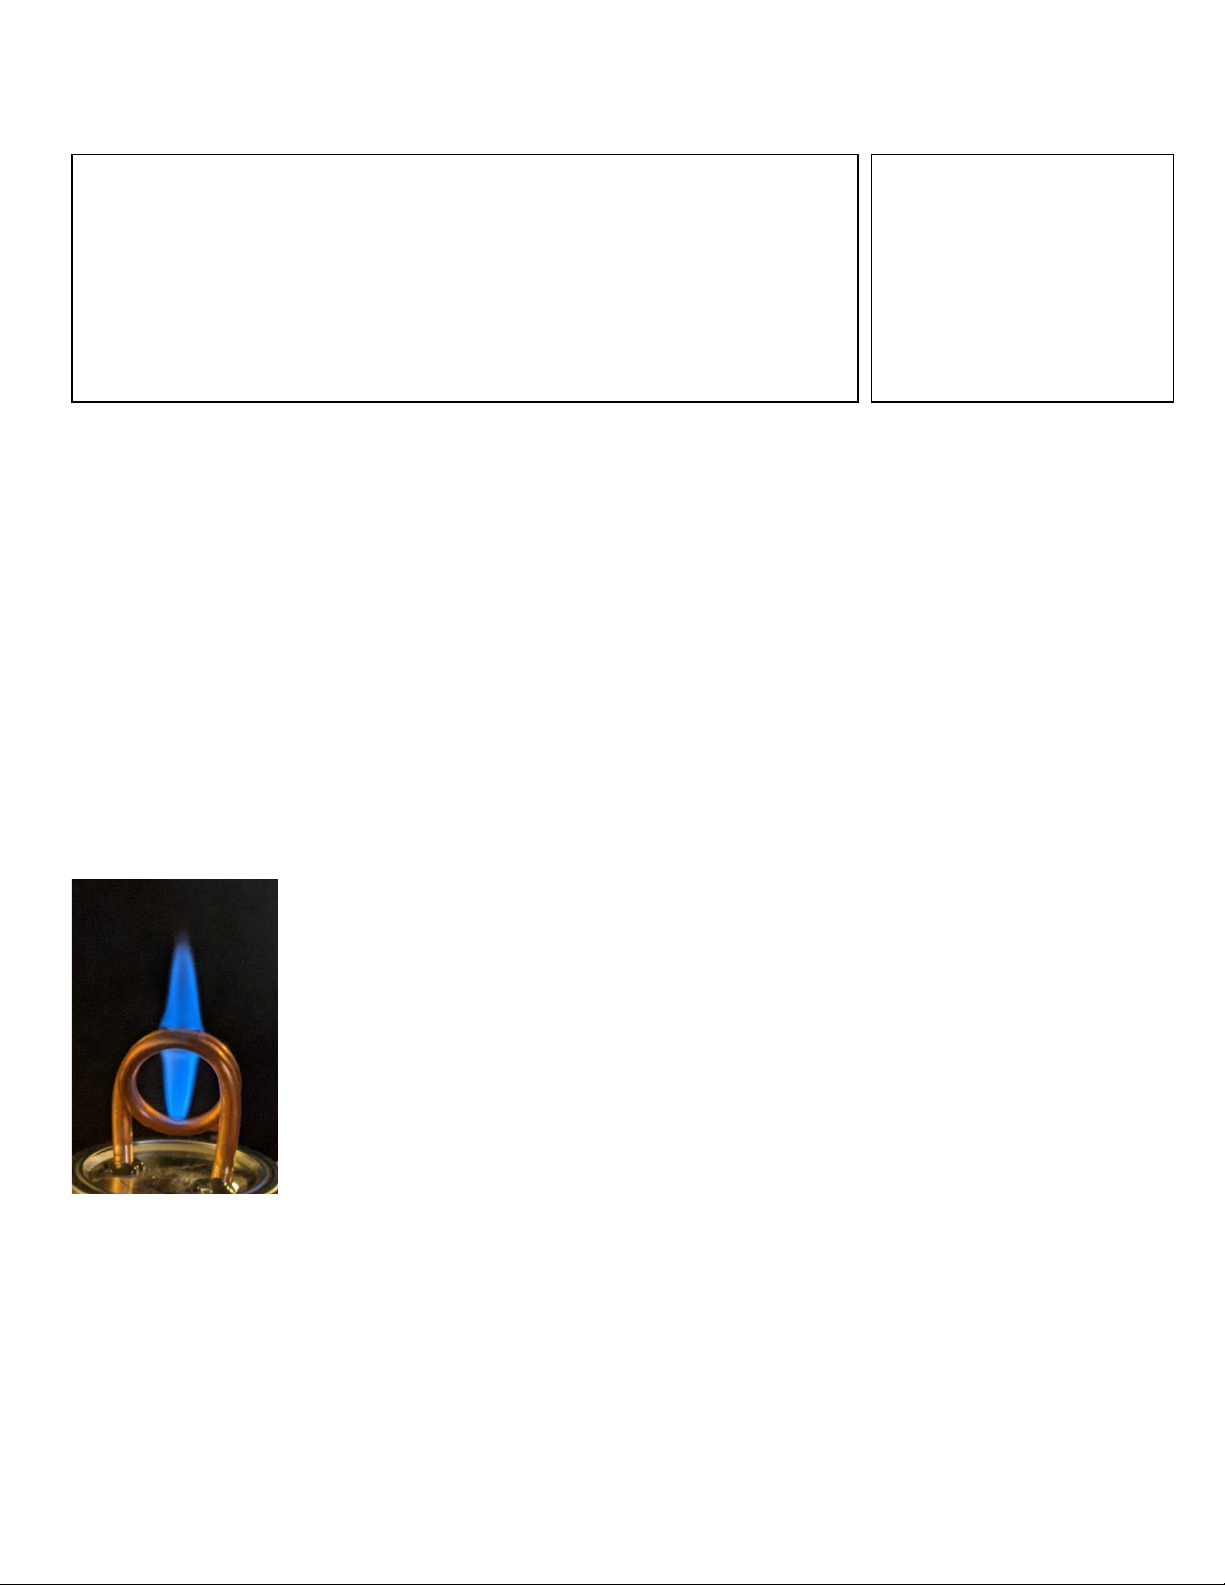
Denatured Alcohol:
Denatured Alcohol is the other main fuel type you will see. It’s made from Ethyl (Ethanol) alcohol,
which is usually drinkable, but has been “denatured” with bitterants and poisonous substances to
make it undrinkable and therefore subject to different regulations. It’s a very pure distilled ethanol
and is sold specifically to be used as a clean burning alcohol stove fuel. It’s often found at hardware
stores in the paint section and at outdoor supply stores and online. It costs about $16 a gallon
(which is about twice as expensive as 70% Isopropyl alcohol).
Denatured Alcohol burns very hot with a blue flame and is sometimes almost invisible.
Because it burns VERY HOT, that makes it great for cooking.
It can be burned in these copper coil burners and works very well with some caveats. The amount
of heat it puts out makes it a lot more dangerous. It can superheat the air in an enclosure and is
more susceptible to flare outs. It can get the Terra Cotta hot enough to crack. The copper coil burner has to tip over almost
90 degrees before denatured fumes will stop flowing and go out.
If you plan to burn Denatured Alcohol Fuel, use the smaller 1/16 (.4mm) hole when building the copper coil and increase
the height of the cap above the flame a few more inches when cutting the wire frame for the enclosure. Also, plan on
burning it for much shorter amounts of time and take more safety measures when handling the Terra Cotta pot and alcohol
burner itself.
WARNING:
Do not drink rubbing alcohol!
Isopropyl alcohol and
Denatured ethanol alcohol
are poisonous and can kill
you even in fairly small
amounts.
Isopropyl and Ethanol alcohols are the fuel you want to burn in
these heaters.
This can be most easily found in three main types:
70% Isopropyl rubbing alcohol
90% Isopropyl rubbing alcohol
90%-95% Distilled Liquid Hand Sanitizer (can be either kind of alcohol)
6
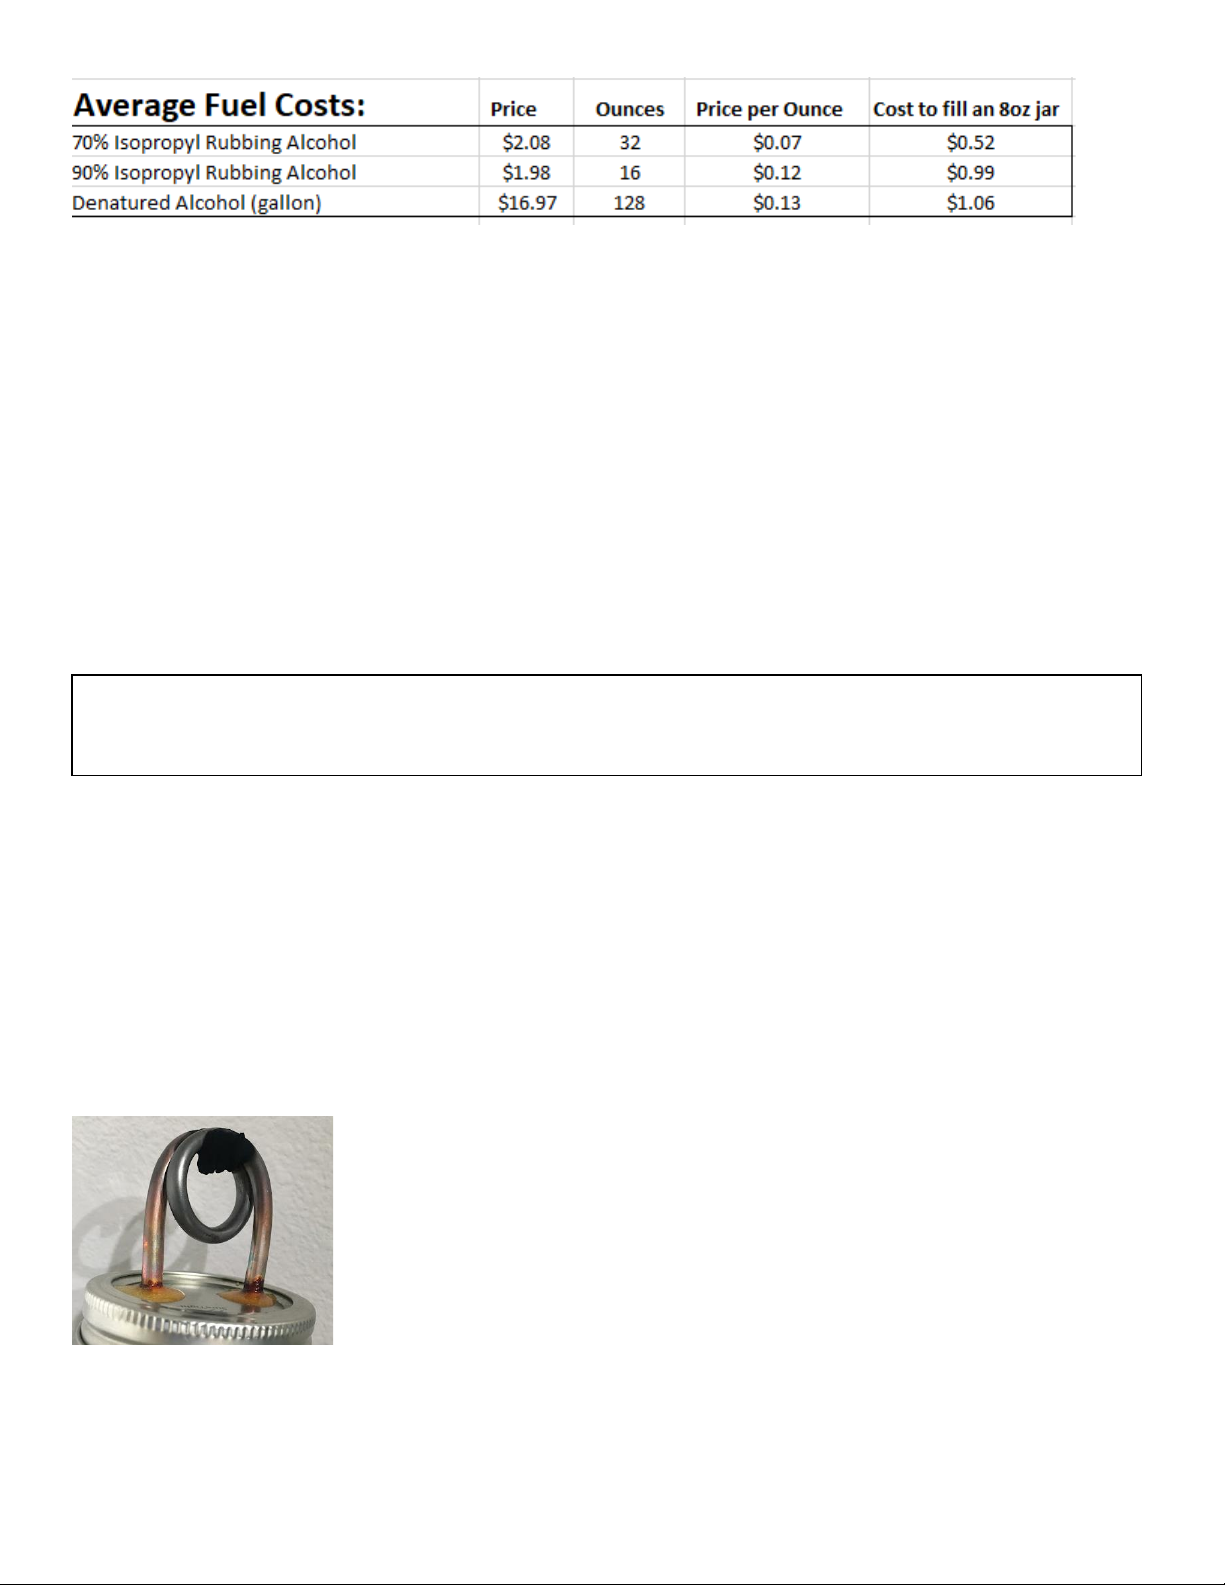
These are the local average fuel costs from stores in late 2021. The best source of fuel is still the high alcohol content liquid
hand sanitizer given out for free here. If you need to buy fuel, that’s a pretty good estimate for what to budget. An 8oz jar
will burn for 5-6 hours.
Generic Grain or Wheat Alcohol:
Ethanol alcohol comes in many forms and is a “drinkable alcohol”, except most industrial products aren’t drinkable. It’s
distilled to use as an equipment sanitizer or cleaning agent and those are usually labeled as rubbing alcohol with denaturing
additives to make it undrinkable. Some geographic areas sell grain alcohol to be used as a fuel additive or as a consumable
neutral base to add more alcohol content to other things. Grain Alcohol is just Ethanol, often distilled in a very pure form,
around 95% to 99% ABV. It will be called Distilled Ethanol, Grain Neutral Spirit (GNS), Extra Neutral Grain Alcohol (NGA),
Neutral Grain Spirits, or Rectified Spirits at wholesale for labs and businesses and might be marketed to consumers as
Everclear, Alcohol-95, and Golden Grain. If it’s pure and doesn’t have a bunch of additives, almost any Ethanol can be used
as a heater fuel, however Heater Bloc has not tested most of these, we assume it burns similar to 95% distilled hand
sanitizer, but might be closer to denatured alcohol stove fuels when burned.
Fuels to Avoid:
All hand sanitizers with additives for scent or things like Aloe Vera for skin health. Only burn the dye-free and scent-free
liquid hand sanitizers.
Most Camping Stove fuels that says they are Denatured Alcohol are often a mixture of several things, one of which might be
Methanol. Methanol fumes can be toxic and unhealthy and the higher the methanol content of the fuel the worse it will be.
These are safe only for burning or cooking outside, not inside a tent. Check any Denatured fuel you are using for Methanol.
Re-Fueling and Burn Maintenance:
All of these fuels except Denatured Alcohol cause a small bit of soot build-up on the
copper coil.
It’s not flammable and is very light and powdery. It WILL cause the heater to burn less
efficiently as it can’t heat the copper coil as well. After a few hours of burning, let it cool and
clean off the soot with a tissue or paper towel or just knock off most of it with a small stick.
The higher the alcohol content in your fuel, the less soot tends to build up.
Also the higher the alcohol content in your fuel, the less water it will leave behind. A bottle of 70% Isopropyl is about 30%
water. The more alcohol fumes you burn off the more water gets left behind. If your flame is very small or you are having
trouble lighting it, that’s probably a fuel issue. The fuel is watered down and not potent enough. Dump it out and add fresh
fuel to the jar.
WARNING: Don’t drink any of the industrial grain alcohols, even if they aren’t denatured. It’s too pure (usually
99% ABV) and can cause alcohol poisoning in even tiny amounts. In normal consumer use, it will be heavily
diluted.
7
-Parts and Costs-
(Also your shopping list)
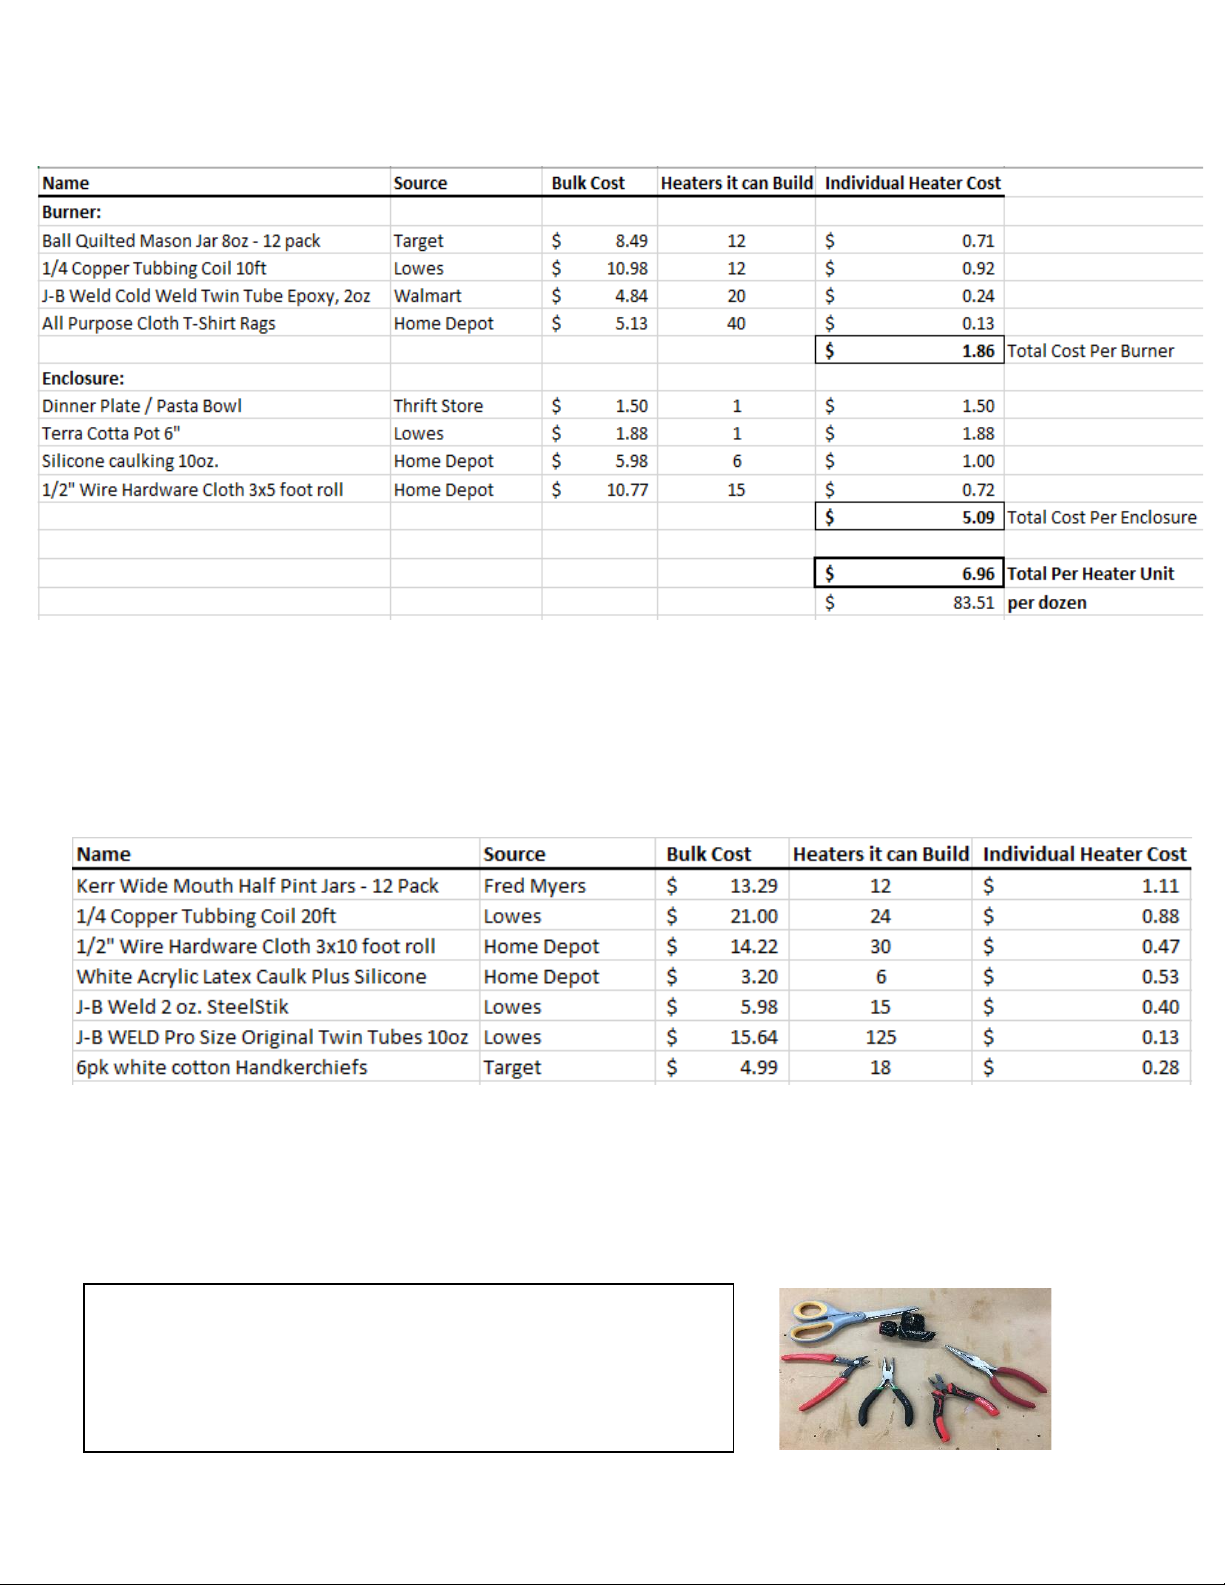
The cost of the Copper Coil Burner is around $2.00 each and the Enclosure is about $5 in parts. Each Heating Unit in total
is going to be around $7 on average, which is actually an amazing price point.
Ask Around Your Community:
You can save a lot of money if you already have some of the things you need. I don’t think anyone will be buying cotton t-
shirt rags if you already have an old white t-shirt to cut up. Canning jars and dinner plates appear on garage sales all the
time, people have these things in storage. “Buy nothing groups” often have old dinnerware.
Find a Local Supplier:
We used Big Box stores to make prices relatable out of our local region. You might also want to find a local
supplier, like a local garden store or local hardware store, instead. Talk to your local businesses and see if
they want to help, they can sometimes order at wholesale prices.
Copper coil tubing is often used in air conditioners, ice makers, humidifiers and refrigeration as well as small
gas lines and water lines. Talk to a local contractor or appliance store and see if they can save short cut-off
scraps for you. You only need 8 inches of copper tubing to make a copper coil burner. Building Contractors
can also buy in bulk at slightly cheaper prices on things like Silicone caulking.
Don’t Use Any Random Jar:
As we documented in the Heat zones part above, there is a heat differential in the glass from
heating and cooling different sections unequally. That can cause glass to crack or break. We
highly recommend sticking to canning and mason jars which are designed to withstand the
heat from the boiling water bath of the canning process. After weeks of testing and use the
jars have not cracked and appear to be able to withstand the stresses. That potential to break
is always there, though, especially if using these in sub-freezing temperatures with a very hot
fuel. Heat tempered glass is ideal for this, don’t use a random pickle jar.
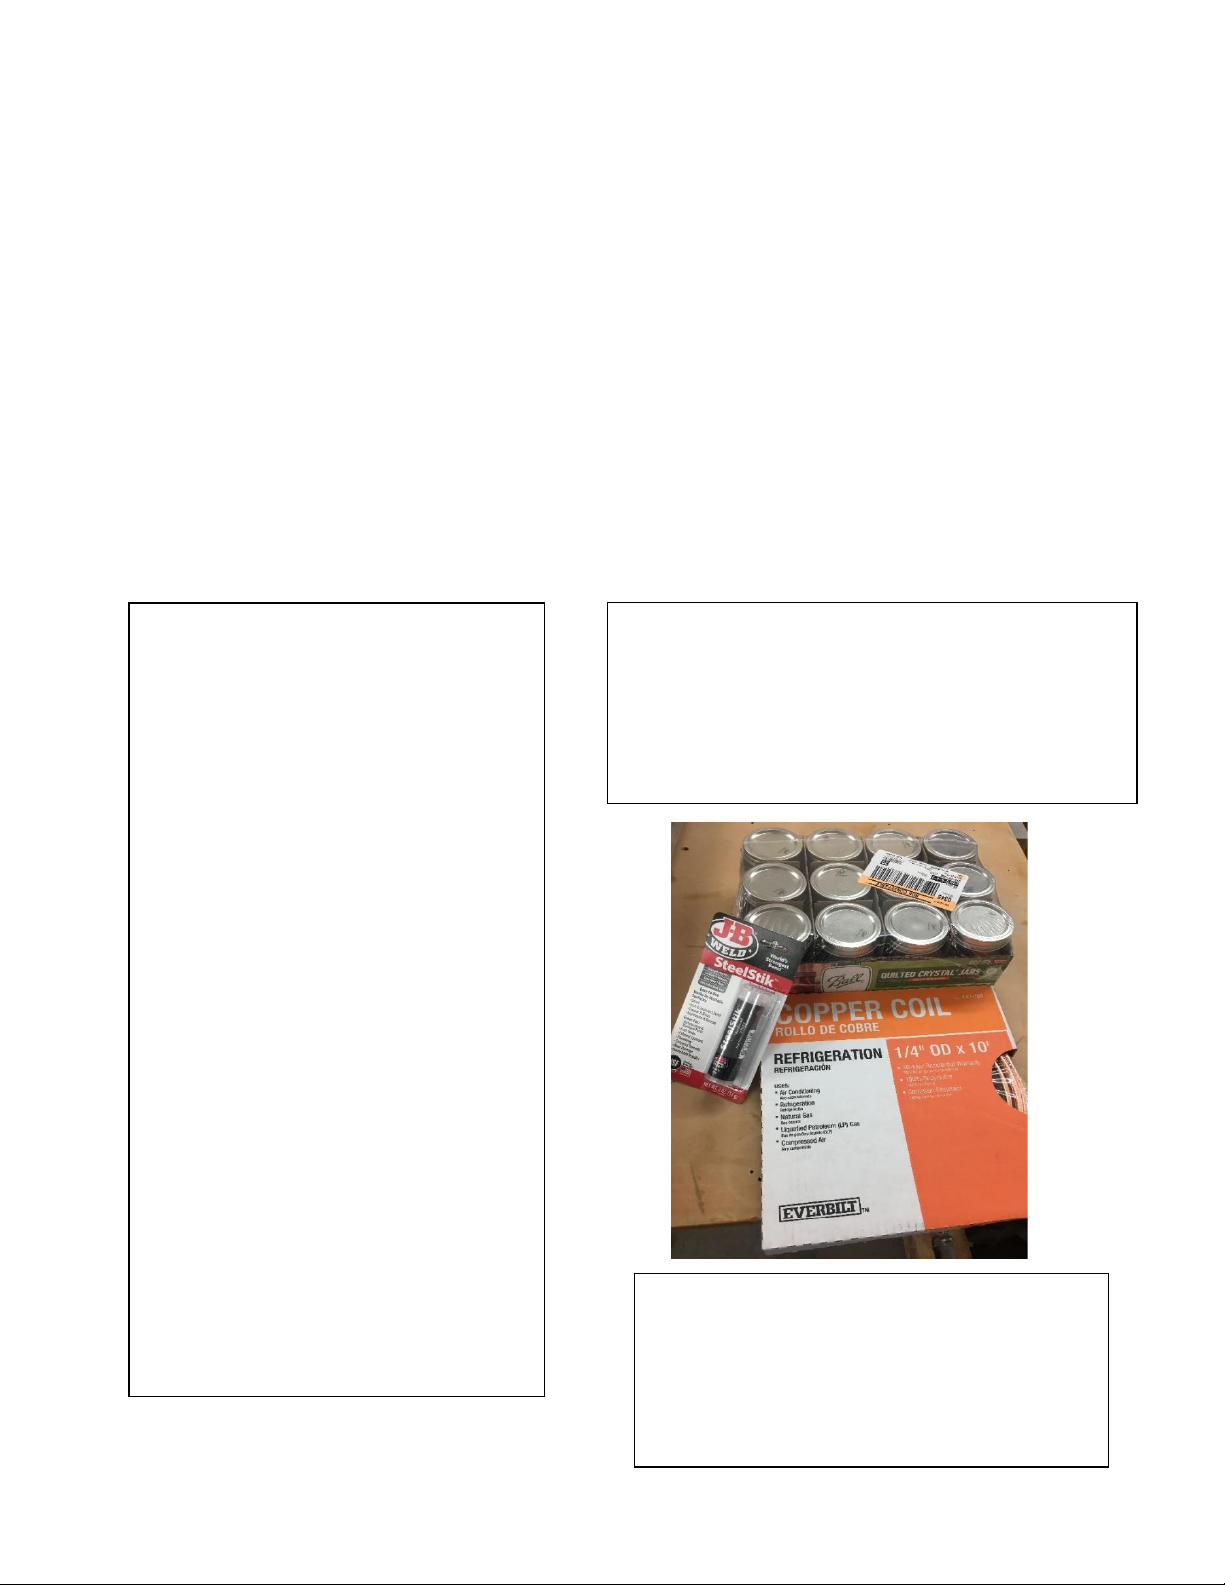
Again, these are bulk prices. Your best price point is going to be around building a dozen heaters at a
time. If you only want to make a few of these for fun, you’re going to have some extra overhead costs
due to leftover materials. The copper tubing comes in a 10ft roll and you’ll have to a lot of extra J-B
Weld (although that’s honestly pretty great for repairs around the house). If you only make, like, 2
burners, I hope you plan to do some canning with the other 10 jars in the pack. Maybe build a small
animal cage with the leftover hardware mesh and get a gerbil.
More realistically, when you are done building, try to find a local group making these for your
community or even a Maker Space and donate your extra copper and other supplies so they can build
more.
You also want to budget some lighters.
The long stem ones are about $1-3 each
Regular lighters vary from $.25 to $1 each.
8
Here’s an idea of what it’s going to cost you to make these heaters
and what you need to get started:
These are late 2021 prices and regional to Heater Bloc.
Some Alternative Prices:
Thing like different size canning jar or a larger role of copper tubing or wire mesh. You can also get the cheaper caulking,
but it takes a lot longer to dry. The shorter, wide-mouth canning jars let you use less wire for the enclosure and make it
more stable, but cost a bit more.
THESE LISTS ARE JUST A GUIDLINE - USE WHATEVER YOU HAVE AVAILABLE AND WHATEVER YOU CAN FIND LOCALLY
(More advise on variations and adapting to what you have are on page 18)
This Doesn’t Include Tools.
None of the tools are specialized, but you’re going to need to own or
borrow all of them. Tools needed are listed in the “Build” sections on
pages 9 and 15.
9
-How to Build a Copper Coil Heater-
Short Version (for people who don’t need to ask for directions):
Cut the copper tubing to length. Fill with salt and bend into a one-inch loop. Drill holes in the jar lid and seal the copper loop
to it with J-B Weld and let it cure. Drill a tiny fume hole. Add the wicks and fuel and screw the jar closed.
Silicone the dinner plate so the burner and enclosure can’t slide around and let it dry. Cut the hardware mesh to size and
make a cylinder out of it. Put the jar burner in place, add the wire cage, and put the Terra Cotta cap on top. Test light it to
make sure it works.
Give it away to someone who needs to keep warm and then make another one. You’re Done!
-How to Build the Copper Coil Jar Burner-
Parts Needed:
1/4 Inch Copper Tubbing (found in 10ft and
20ft lengths)
Glass Canning/Mason Jar with Lid (6oz or 8oz)
J-B Weld two-part epoxy
Cotton T-shirt Wick Material
Tools Needed:
Safety Glasses
Handheld Drill
5/64 drill bit
1/4 drill bit
3/8 Counter Sink drill bit
Hack Saw with a good metal blade
OR a small Metal Tube Cutter
Masking Tape
Table Salt
Squeeze Bottle Cap or Tiny Funnel
Small cup or bowl of some kind to
catch loose salt.
1-Inch diameter dowel or pipe or
socket
Vice (maybe)
Sharpie
Sand Paper (180 grit or similar)
Scissors
Scrap Wood to drill into
Disposable gloves (maybe)
Paper plate or cardboard scrap
Small clean applicator stick, like a
disposable chopstick
Optional: Center Punch
Optional: Small 12” Pry Bar
Remember if you work in teams, lots of steps can
be sub-divided up. One person can bend copper
while others sand and clean up burrs. One
person can be cutting wicks while other’s feed
them into the burners. One person can be cutting
wire while others hook the cages together.
10
Make the Copper Coil:
(This is definitely the most involved and precise part.)
You’re going to be drilling and cutting and deburring copper and aluminum as well as using epoxy. Please use safety glasses
to protect your eyes when necessary.
1. Cut a piece of copper tubing to about 10 inches in length
Notes: You could go longer than 10 inches, like 12 inches, until you get really good at bending it. This doesn’t have
to be exact, but don’t crush the ends closed. The best tool to cut the copper with is a Hack Saw or a Metal Band
Saw (if you have a shop). Copper Tube Cutters (the kind plumbers use with a small blade that you spin around the
pipe in a tight space) work okay. This small copper tubing tends to crush easily so be gentle and not overzealous
with how hard you tighten the cutting blade, tighten it and spin, then tighten again and spin and repeat until you
have a nice cut. If you use a hacksaw, have a nice new blade and let the saw do the cutting, you don’t have to push
very hard, copper is soft.
2. Cap one end of the copper tube piece. Small pieces of tape honestly seems to work the best for this. Masking tape
is the easiest to work with and the cheapest. Duct tape and packing tape work, too.
3. Fill the tube with table salt using a tiny funnel or a paper cone or your hand
that you try to cup round the tiny little hole and pour salt into it, you’ll make
a mess, but it kind of works… the best tool we have found is the lid to a
squeeze bottle. Like a glue bottle or ketchup bottle with a tiny nozzle… or
something similar. You can buy these bottles cheap and sometimes just the
caps.
Note: It takes surprisingly less salt to fill the tube than you think it will.
4. Tape that end closed, too
Notes: If there isn’t anything inside the tube it won’t bend, it will just kink and become useless. Fine sand and rock
salt also work. Table salt seems to work the best. We tried freezing water inside it once, that didn’t work, either.
Use salt.
5. Set-up your pipe bending station. Find a sturdy 1-inch diameter tube or dowel or metal rod or large socket that you
will bend the copper pipe around. Put this into a Vice or something similar to hold it securely. The key to getting a
good bend in the copper tubing is to make sure the thing you are bending around is very secure and sturdy. If you
are doing a bunch of these make a jig out of a wooden dowel or metal rod.
6. Bend the copper tube into a complete loop around the 1-inch dowel using your hands. Use steady, but slow
pressure. There’s a few different types of ¼ inch copper tubing. Some are thinner or weaker than others. Those
need pressure near the dowel to bend well, others, need pressure out at the end of the tubing.
Notes: It can be a little bigger than an inch but you won’t really get a nice bend trying to go much smaller than that.
Be prepared to mess up a few times before you start getting the bend just right. Also, you want a gap between the
coils, if it’s too big you can flatten it a bit, but you don’t want them touching completely. A 1/8 to 1/4 inch gap is
about right. The ones below got a good bend, but will probably be flattened a bit. If it’s too flat or close together,
carefully use a wide, flat tool like a small 12” flat pry bar or stiff-blade putty knife to widen the gap a little.
11
It’ll look like this:
(Ignore the orange cap things, they don’t work as well as tape)
Cut and Clean-up the Ends of the Copper Coil:
If it didn’t bend evenly, you can cut the copper tubing so both ends are
even. Shortening them is Not required, it’s just for aesthetics, but it
makes feeding it into the jar lid and feeding the wicks in A LOT quicker
and easier, later on. Do that here after dumping the salt.
You need to keep about 3/4 to an inch of pipe below the loop to have
enough to feed through the jar lid.
The ends can be rather rough after cutting them. We need to clean that
up a bit. Some of this is probably optional, it’ll still work if you don’t
clean anything up as long as you can get the wicks into the ends of the
copper and don’t cut yourself on the sharp edges.
1. Remove the tape and dump the salt into a cup to be re-used. Not re-used for cooking, just for making more coils, it
might have copper shards in it. Or just dump it in the trash, whatever. You can also use an air compressor to blow it
out, or rinse it out with water, or even soaking it in water to let the salt dissolve, but shaking usually works.
2. Clean up the burrs and rough edges. Use sand paper (180 grit works great) and clean up any burrs and rough edges
on the outside and the end ends of the copper tubing. Having your sandpaper on a sanding block helps sand the
ends (or if you have a shop, use a belt sander).
12
3. Use a 3/8 Counter Sink drill bit and drill lightly into the end of the tubing to clean up the inside and remove any
burrs from the cutting process. Making the inside smooth will also help a lot later when feeding in the wicking
material.
Notes: A single flute counter sink drill bit is the best, if you can find one. Alternatively, you could just jam some
small needle nose pliers in there and knock out any obstructions. You can find hand tools specifically for de-burring
metal and there are handheld reamers & countersink tools that work instead of using the counter sink drill bit.
4. Use a piece of loose sandpaper to rough up around the ends of the tubing. This is to help with adhesion of the
epoxy later. After sanding, clean it off with a rag and some rubbing alcohol or acetone.
Note: We didn’t include this in the tools section, but you’re going to want a vacuum or broom to clean up your mess when
you’re done. We just assumed you’d realize this was going to be messy and take care of that without us mentioning it.
Feed the Copper Coil into the Jar Lid:
1. Put the ends of the copper tube against the jar lid and mark where you need to drill. Mark the lid using a sharpie
or something similar.
2. Using a 1/4 inch drill bit and a hand drill, punch two holes thought the jar lid. Put it down on a flat surface like a
piece of scrap wood you don’t care about punching holes in and drill straight down. Don’t try to just hold the lid in
your hand. Also, don’t try to drill it while the lid is screwed onto the jar. The bit is going to go through the thin metal
really fast. If your bit goes through and hits the glass it could break the jar.
3. Clean up burrs and rough edges on the jar lid holes with the 3/8 inch counter sink drill bit. This part you can do
while the lid is screwed onto the jars if you want to.
4. Rough up the outside of the top of the metal jar lid around the hole with sandpaper. This will help a lot with long-
term adhesion when you apply the J-B Weld later. After sanding, clean everything you just sanded with a rag or
paper towel and rubbing alcohol or acetone.
5. Feed the ends of the copper tubes through the jar lid holes.
You’d think this would be the easiest part, but the tubing likes to not line up just so
work it a little and bend the copper a tiny bit if needed.
You want the copper loop about 1/2 inch above the jar lid with at least 1/4 to 1/2
an inch of the tube inside the jar lid. You can have a lot more inside the lid, but you
don’t need more.

13
Seal the Jar Lid Holes with J-B Weld:
Best Option: “J-B Weld Cold Weld Twin Tube Epoxy”:
“J-B Weld” is a heat safe (up to 550 degrees F) two-part epoxy that is available at about any hardware store. We
recommend the “J-B Weld Cold Weld Twin Tube Epoxy”. The 2oz package can make 20-25 heaters and the 10oz “Pro” size is
good for over 100.
The roughing up with sandpaper you did in the last two sections section will help with adhesion. If you waited a long time
between these steps, make sure the areas where you are applying J-B Weld on the jar lid and copper coil are clean.
You’ll need a disposable mixing surface, like a paper plate or clean piece of cardboard or scrap wood. You might need some
disposable nitrile or latex gloves.
You also need an applicator stick of some kind. Craft stores sell “Wood Spatula Applicators” or “Craft Sticks” and similar
things. Popsicle sticks are going to be too wide. Something similar in size to a disposable chopstick works great. In a pinch,
you can cut up a free paint stirring stick.
Follow the directions on the J-B Weld packaging, but the basic steps are below.
1. Mix the J-B Weld you need in small portions. Squeeze out a little bit in equal
amounts from each tube and mix it together with your applicator stick. This
activates the epoxy, so you don’t have very long to use it. A small portion can
seal several jar holes.
2. Apply a small piece of J-B Weld around each hole using the applicator stick.
Make sure you get all the way around the copper. It doesn’t take very much.
You also don’t have very long to use it before it starts to set, so glob it on there.
You can smooth it out a little with your finger if you are wearing a disposable
glove.
3. Let it sit for a full 24 hours. Preferably, not inside your house. It will smell for the first few hours as it sets. The J-B
Weld will harden in about 5-10 minutes and you’ll want to give it a full 24 hours to be fully cured and ready for
heat.
Lesser Alternative Option: “J-B Weld Steel Stick”:
There’s another type of J-B Weld that also works called “J-B Weld Steel Stick” that is the same two-part epoxy, but in a
putty form. It’s only rated to 300 degrees F, though. It takes a bit more and we’ve found one 2oz “steel stick putty” can
make about 12 to 15 heater lids. So it’s about half as affordable as the original J-B Weld. However, it doesn’t need to be
mixed on a surface or applied with a stick. This makes it better for “field repairs” and quick applications.
1. Cut or rip off a small piece (about a 1/4 inch worth) of the epoxy putty and
work it with your fingers until it mixes and activates. Try to get equal amount
of both the grey and black parts, which means cutting it off is probably safer.
You really want to cover your fingers with something like disposable nitrile
gloves, or in a pinch, a sandwich bag, but if you have a place to wash your
hands, you don’t absolutely have to. The J-B Weld will become stickier and
warmer as it activates.
2. Use your fingers to work it in and around the copper pipe and jar lid hole. You have a short amount of time to
work with it before it hardens. It’ll look kind of like a little putty volcano shape when you’re done.
3. Let it sit for a full 24 hours to cure. Same as above.
14
Drill the Fume Hole:
After the J-B weld is cured, you want to drill a small hole in the top middle of the bottom copper loop.
This hole is very important and acts as the Flow Regulator for the alcohol fumes. How big do you want that flame to get?
Small drill bits tend to also be very short. We recommend finding one that will let you drill
straight down from the top between the copper coils. If your drill bit is too short to drill in
from the top of the loop, you can drill carefully from the side, but get the hole in the
middle-center of the copper tubing. This is a delicate, focused step. Only put a hole on the
top side of the tube, don’t accidentally punch all the way though both sides.
Note: if you happen to have a center punch, you can make a tiny dent in the middle of the
copper tubing to help keep your bit from slipping while you drill. It’s not necessary, just
helpful.
Add Wicking Material:
A wicking material needs to be fed into the holes in the copper tubing. This will be inside the jar and carry alcohol up into
the copper tube. Fumes coming off the wicking material will feed the flame.
Anything plant-based seems to work: string, lantern wicks, cotton balls, even rolled-up paper towel will work for a while.
Woven cotton (t-shirt) material is our preferred wick. It works wonderfully and is very affordable and easy to find. Use an
old white t-shirt or handkerchief or pack of t-shirt rags and cut it into long skinny strips. We use white so we don’t have to
worry about fabric dyes leaching into the fuel.
You need Two identical Wicks, one for each
end of the copper tube.
The Wicks needs to be about 1/2 to 1 inch wide
(depending on the thickness of the cotton
material) and long enough to reach bottom of
the jar from about the center of the copper
loop.
To feed it into the copper pipe, use a roll and
push motion and feed it into the tube until it’s
about an inch or so above the jar lid inside the
pipe (just estimate).
Now, Fill with your choice of fuel and screw the jar lid on tight. The Copper Coil Burner is Done!
Here’s a quick guide to help choose a bit size:
1/16 (1.5 mm ) – tends to be too small for isopropyl alcohol, the flame will be about the size of a burning candle, but
this size works great if you are planning to use Denatured Alcohol.
5/64 (2 mm) – Recommended size. It burns well, but the flame stays in the 2-6 inch range, typically.
3/32 (2.5 mm) - The flame will vary from 2-8 inches above the hole and tends to work well, it’s just harder to contain.
(You can always go bigger, you can’t go smaller)
15
-How to Build the Safety Enclosure-
Building the safety enclosure part isn’t as specific as building the copper coil burner. I’ll give you specifics on one type and a
lot of general advice on adapting this to your needs because, honestly, use what you have and make it work. The things we
can find cheap in stores here won’t be the same where you are.
You need three pieces:
1. A stable, flat surface so the burner can’t tip over easily on uneven or soft surfaces and can’t easily slide around.
2. Something that protects the flame from casually coming into contact with other things to protect against burns
and fire risk BUT ALSO lets it breath a get plenty of oxygen. This can be used as a cooking platform for skillets and
pots.
3. A fireproof cap of some kind that to keep flames shooting upward mostly contained and to help radiate and
contain the heat to a smaller area to make it more efficient at heating.
The best and most affordable solution we’ve found so far is to use a thrifted heavy stoneware or porcelain dinner plate or
wide paste bowl for the base, ½ inch wire “hardware mesh” (readily found at hardware stores for building small animal
cages) for the breathable cage around the flame, and a Terra Cotta Pot as a cap for the top. Terra Cotta clay used for rough
earthen pots is heat safe and has properties similar to an oven dish. It can take a lot of heat and makes a great flame
resistant cap. Silicone caulking is used to create thick rubbery rings on the plate to keep burner and wire enclosure from
sliding around.
The most common jar we’ve found for the burner piece is about 4 inches tall and holds 8 oz. of fuel. There are some short
2.5 inch “wide mouth” mason jars that work well, too if you can find them. The shorter the jar, the shorter your overall
enclosure can be and because Terra Cotta makes it top heavy, you don’t want to make things too tall and skinny, so that’s a
bonus. The entire design has to adapt around how tall your jar burner is and how big your Terra Cotta piece is.
Instructions for Building an Enclosure with a 4-inch Tall Jar
Burner and a 6-inch Wide Terra Cotta Pot:
Create the Wire Cylinder:
Parts Needed:
Stoneware dinner plate or wide pasta bowl with at
least 6 inches of flat space in the middle
The Copper Coil Burner (or at least the jar part of it)
Any size roll of 1/2 Inch galvanized hardware mesh
(you need an 8” by 18” piece)
6” wide Terra Cotta Pot
“Silicone Caulking”
Trash can or box
Tools Needed:
Long Nose or Needle Nose Pliers
Small Diagonal Cutter or a Small Flush Cutter
Caulking Gun
Knife to cut caulking tip open
Wire or a Nail about 3 inches long to puncture the
foil seal inside the caulking tube
(Small cheap pliers and cutters work fine here.)
16
There’s a little bit of circle math here, but I’ll get into that later. You are going to be creating a cylinder that hooks onto itself
and fits inside of the 6” Terra Cotta pot. The inside of the pot actually measures about 5 ¼ inches across so your cylinder
can be about 5 inches in diameter.
A 16 inch long piece of wire will bend into a circle of approx. 5 inches. But you also need a 1 inch overlap AND you need to
leave loose wires at one end for bending.
The cylinder needs to be 8 inches tall. This leaves about 1.5 to 2 inches of empty space above the top of the copper coil
burner before the cap encloses it. This seems to be the sweet spot in trapping the heat in the pot on top without having too
much flame shooting out the vent hole or overheating the Terra Cotta.
The cool thing about 1/2 inch hardware mesh is you don’t need to measure it, you can just count the squares because each
one measures 1/2 an inch. If you are making a whole bunch of these, cut yourself a couple little long skinny wire strips as
guides that are length you need to cut each side of the enclosure for quick measuring.
1. Open up your roll of 1/2 inch hardware mesh. It’ll want to keep it’s bend from being rolled up, use that to your
advantage when making cylinders, don’t try to bend it the other way, it’ll make a mess.
2. Use the angle cutters to cut a piece of wire mesh 8 inches tall and 17 inches wide. The top and bottom of the
cylinder need to be smooth. So does one side. After you count out 17 inches wide go an extra half an inch and cut the
wire so you have a bunch of wire pieces poking out on that end. You’ll bend these over to hold everything together.
Sometimes a diagram work betters.
It’ll look like this but 16 squares tall and 34 squares wide plus the extra wires on one end:
Notes: The easiest way to make a bunch of these at once is to just measure out your long side 17 inches on the curve (plus
the extra bending wires) and then cut straight down all the way. You’ll have a piece 17 wide and 3 feet tall. Now cut that
into 8 inch tall sections. You’ll get 4 pieces and have like 2 inches of trash.
You’ll sometimes end up with a row of poking out wires you won’t need. Like when you cut the 8 inch sections. Have a trash
can or cardboard box handy and clip these directly into it to make less of a mess.
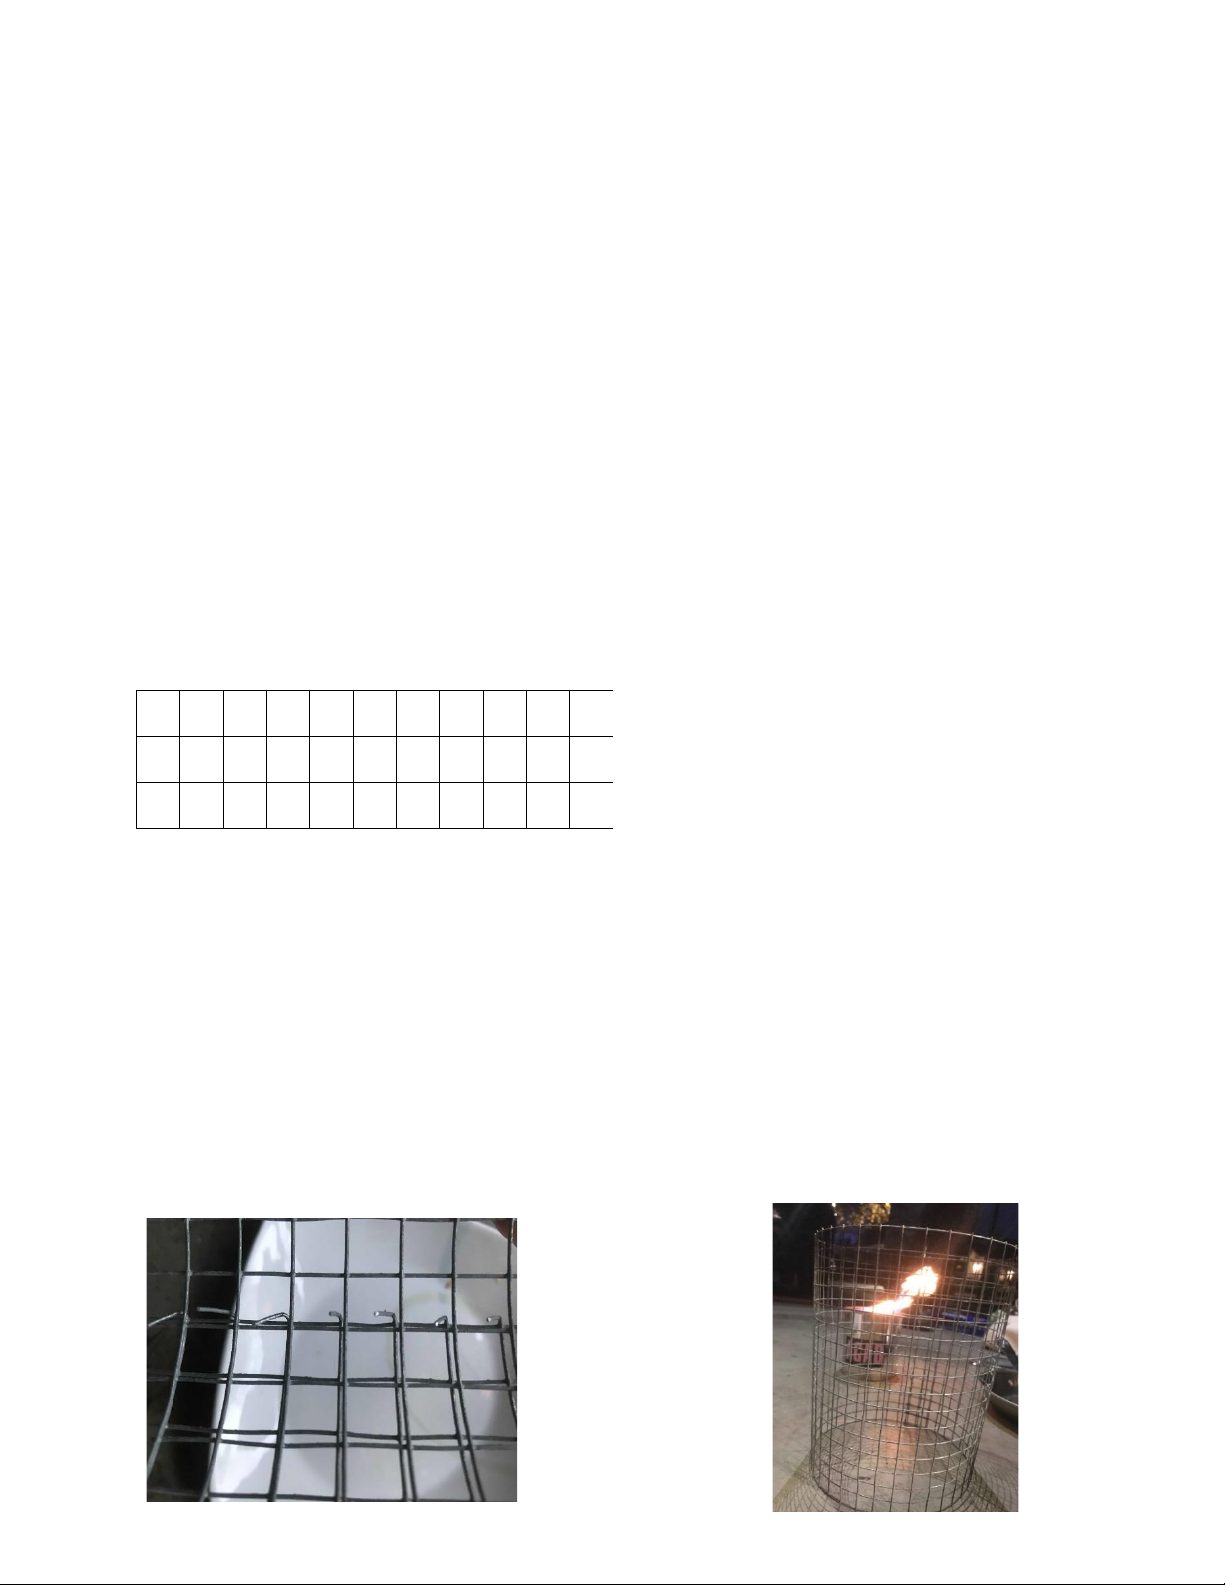
3. Now bend over each of the short wires to make hooks.
4. Bend the entire piece into a cylinder and hook it together with a 1 inch (two little squares worth) of overlap. Use
the needle nose pliers to bend the wires tighter once you have it hooked in place to make a nice tight cylinder. It can
help to bend the two End wires up and around the top and bottom of the frame to keep it from sliding. If any of the
wires break, don’t worry too much, there are lots left to hold things in place.
17
Make the Plate Non-Slip Using Silicone:
Use the “Silicone caulking” (which is a fireproof rubbery substance used for sealing around windows and other things to
keep water out) to create a thick ring of silicone to hold the jar burner in place on the plate. Then a second ring to hold the
wire mesh cage.
1. Cut the tip off your Silicone caulking tube so you have the widest option possible.
2. Puncture the foil with a wire or nail and put the tube in your caulking gun.
3. Hold the Jar in the middle of the plate and put a big thick blob of Silicon all the way around it. Spin the plate to
make this easier. Then go around the jar again to make the Silicone thicker and taller.
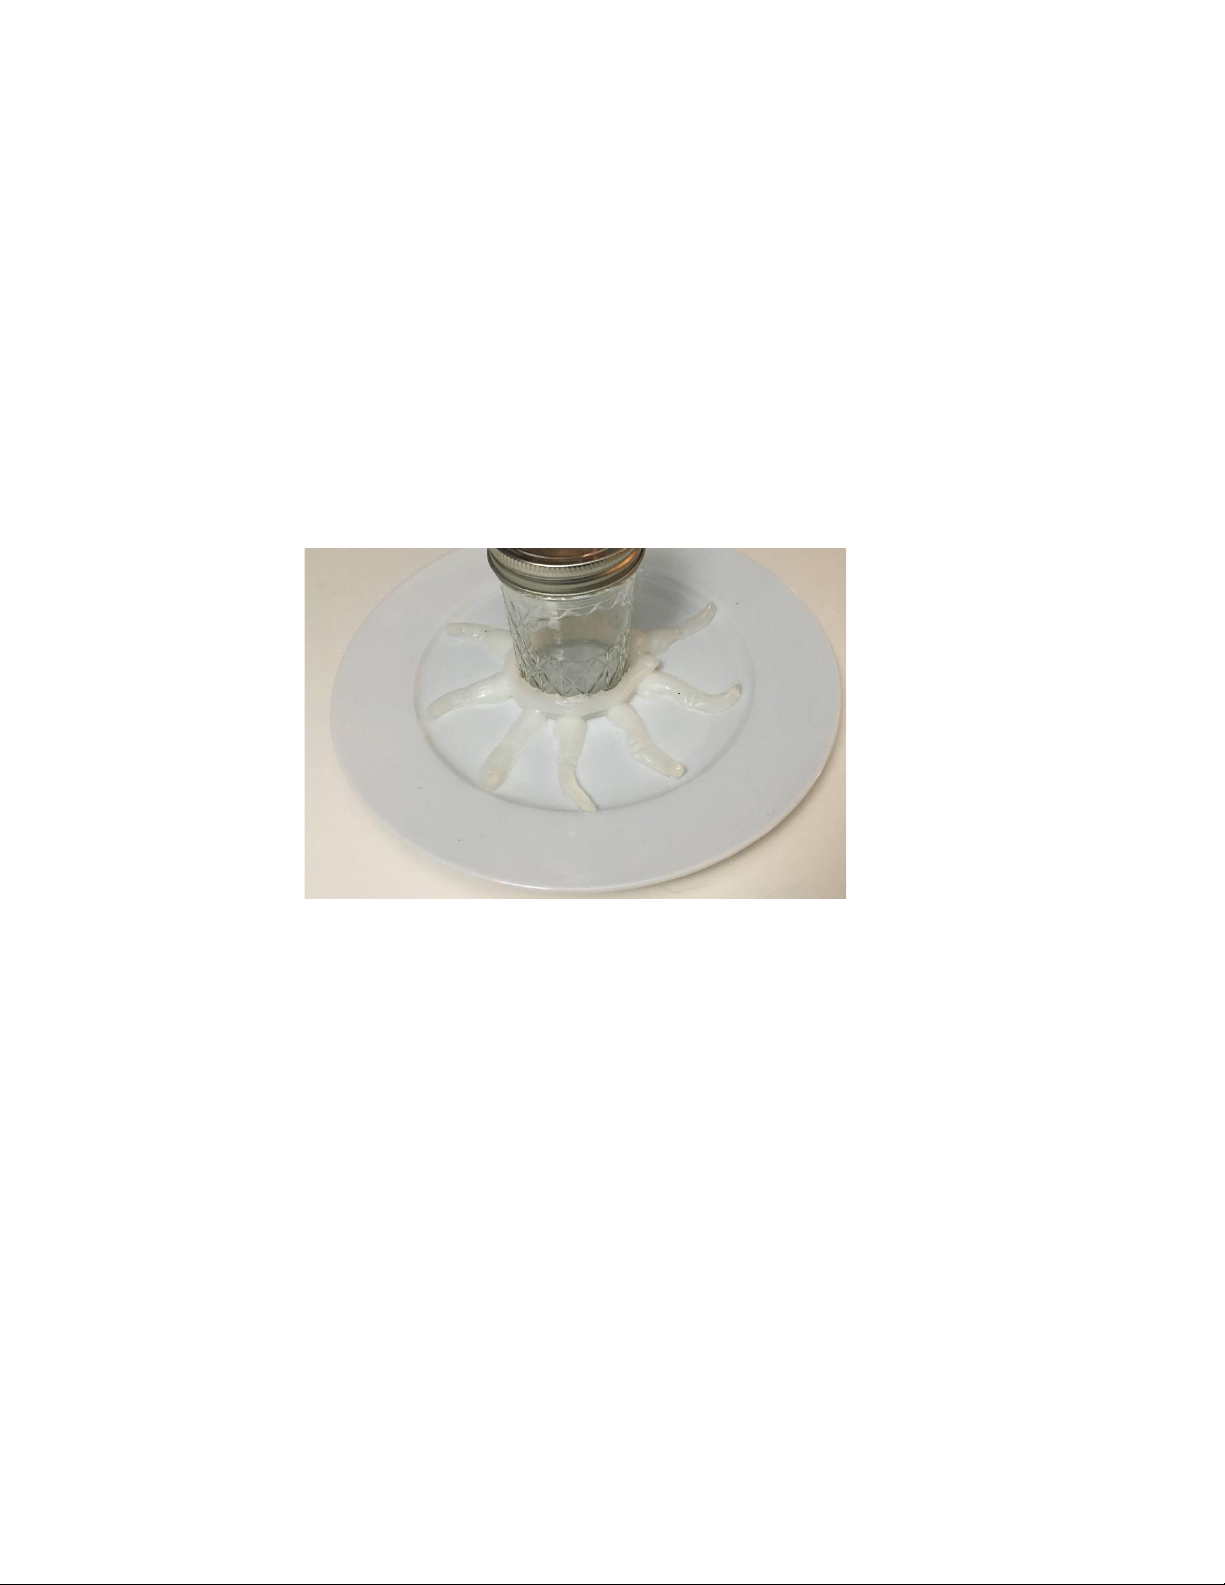
4. Now add more to keep the wire mesh cylinder from slipping around. The best design for this is to make a bunch of
lines coming off the circle in the middle, like you are a toddler drawing a sun with sunbeams coming out of it using a
giant crayon… OR maybe it’s a tentacle monster, I don’t know. The point is you’re not a toddler and you’re using
Silicone just make the same shape. Try to get the tentacles even in thickness. You don’t need to make it super thick
like you did for the jar. (The tentacles in this picture could be thinner.)
Notes: When you put the wire cage and pot on these silicone lines, the wire will sink in a little bit and keep things
from sliding around. It works pretty well. Making a circle around the wire enclosure, like you did the glass jar, just
doesn’t seem to work well because it has to be too precise. The cage can still fall over, but it won’t slide around.
(Use a wide nail or screw or plastic wrap and tape to close off the tip of your Silicone tube if you didn’t use it all).
5. Leave that somewhere NOT inside your house (this stuff smells as it dries) for at least the first day. It’ll take about
3 days for it to set up completely because you’re putting it down so thick around the jar. Yes, really, it takes that
long. If it’s too cold outside it won’t set at all. Putting these in a garage or utility room or shop is great option, if you
have it. Sometimes it’s good just to pre-make these plates if you have the Jars even if you haven’t done the copper
coil part for them, yet.
Notes: The 100% Silicone dries faster so that might make it more valuable to you to get these made quicker. The
Acrylic Latex caulking with Silicone can take over a week to dry. Get the stuff that starts white and dries clear so
you can tell when it’s dry.
6. After it’s dry, you’ll need to carefully Cut away the silicone from against the glass using a small knife and wiggle
the jar out of the silicone ring. Take a small thin blade (utility knife, small Leatherman, pocket knife, etc.) and just
push it straight down between the glass and the silicone ring a bunch of times going all the way around the jar. That
should allow you to separate the jar without damaging the silicone ring. When you’re done you’ll have a nice secure
rubbery circle that will hold the jar fairly securely on the plate.

18
Put Everything Together:
Put the copper coil burner in the middle of the plate, put wire mesh cage in place around the burner (push the cage down
into the silicone a bit), and then turn the Terra cotta Pot upside down and put it on top. The enclosure is complete.
(You can decorate the plates with STICKERS! The plates don’t get hot at all. If you want to print out some little instruction
labels, that’s cool, but you can also just stick logos and things on them.)
Adapting the Enclosure to the Materials You Have:
The dinner plate we use as a base is just to provide a flat surface because the canning jars are so skinny and prone to falling
over. They are fire safe fairly easy to find and affordable both new and used. The base part doesn’t get hot at all. You can
use any portable flat surface. Wood should work fine and you could even drill a large hole for the burner instead of making
a silicone ring. Anything non-flammable like glass and metal platers, thick plastic cutting boards, concrete pavers, flat terra
cotta platters, and flat pottery pieces would all work fine as a steady base for the heater. It should be several inches bigger
than your wire cage and pot in diameter, but you know, be respectful that tents are small and don’t have a ton of space for
your 3-foot-long piece of plywood. If you want to add a plastic milk crate to use as a table under the whole thing to raise it
off of ground level, some people will appreciate that.
We haven’t found anything that works better than galvanized wire mesh for the cage, since it’s very affordable and easy to
work with. You could use other types of wire hardware mesh, there is a 1/4 inch version with smaller holes that works okay.
It’s just a bit harder to work with and the wire is usually thinner, so you might have to use tie wire to hook it together.
Chicken wire wouldn’t work as it doesn’t hold weight. We haven’t tried other fencing materials.
You CAN use Terra Cotta platters (the flat plate-shaped pieces that typically go under pots and planters), as a cap on your
enclosure instead of a pot. If you do that you need to raise the wire mesh cylinder height by several inches. The platters
don’t have a vent hole and the flame will lick out around the edges when it has no place to go. The newer ones are also
fairly thin and more prone to cracking if they get too hot. The old, large, thick platers work very well. As a bonus, the platers
are flat and can be use as warming surfaces for things like hot drinks.
If you want to use it for more efficient cooking, you will want to cut a wire mesh cage that only about 1 to 1.5 inches taller
than the copper burner. The 8-inch one in the primary design above is fine for cooking, but is not as efficient as placing the
pan directly above the burner at about 6 inches. You can also make it wider to accommodate a larger frying pan or pot. The
wire mesh cylinder can hold a lot of weight, just make it wide enough to be sturdy. (In our tests, depending on the type of
fuel and size of the flame, you can simmer water in about 10 minutes and boil it in about 20.) Bigger, thicker Terra Cotta
pots are great! We chose the 6-inch ones as the default because they work and they are widely available and affordable. If
you go with a bigger pot, just adjust your wire mesh cylinder to a bigger diameter to accommodate it. Circle Math is below.
Bonus Circle Math:
If you are using different sized Terra Cotta pots and platers for your cap, you need to figure out how long to cut your wire for
the cage enclosure to fit them. You can start big and just use trial and error to cut is smaller until it fits inside the pot, but it’s
actually pretty easy to figure out with math.
Measure across the Inside of the Terra Cotta Pot opening to get the diameter of the circle you need.
The Diameter [times] Pi [equals] the Circumference – or rather the length of the outside edge of the circle -- the length you
need to cut your wire mesh to make a circle that size.
Let’s say the pot is 6.5 inches across on the inside. Pi is 3.14.
So…. using a calculator to multiply… 6.5 x 3.14 = 20.41
Round up or down as needed. In this case it’s really close to 20.5 inches. Remember to also add an extra inch for overlap. Cut
your wire 21.5 inches long and when you bend it into a circle you will have one that is very close to 6.5 inches in diameter.

19
-Maintenance-
Soot: As we said above in the Fuel section, a bit of light, powdery soot will build up on the copper coil as you burn rubbing
alcohol. The lower the alcohol rating, the more soot seems to accumulate. This isn’t dangerous, but it can prevent the flame
from heating the copper as efficiently, resulting in a smaller flame. When the copper coil is cool, clean the soot off with a
tissue, paper towel, leaf, stick, etc.
Fuel: When using isopropyl, it's mixed with water. 70% has about 30% water. 90% has about 10% water. As the fuel burns
and gets lower, the concentration of water increases, so the flame seems to get smaller as well. Eventually it will go out
when there aren’t enough fumes to sustain the flame. When refilling, it's recommended to dump out the old fuel and add
fresh alcohol if the flame is weak.
Wick: If the wicking material falls out of the copper pipe inside the jar- just stick it back in. If it happens a lot, get a thicker
piece of cotton cloth to replace it. If the wicking material is thick enough, it won’t fall out.
Seal on top of the lid: Sometimes after a lot of use or if the copper pipping gets wiggled back and forth too much the J-B
Weld holding it to the lid will crack or loosen from the lid. You can still use the burner, but might lose some fuel to
evaporation and it won’t be completely spill proof. You can pull the pipe out of the lid, break and clean off the old J-B Weld,
and reapply new J-B weld. A premium silicone would also work in a pinch. The holes need to be sealed well so the alcohol
doesn’t spill or evaporate.
-Go, Build Something for Your Community-
That it, we’re done giving you advice. This is kind of long because we want you to learn from our mistakes so you can make
heaters easier and faster, that’s all.
We have a twitter and email listed below. As you find better ways to do things or better design options or materials or if
you have feedback on usage in different environments, please share with us and the community. Iterative improvement is
where it’s at, but don’t spend so long improving things that you never make any heaters. It’s more important to keep
people warm then to create the perfectly engineered solution. There is another guide for Can Heaters that work outdoors
and in bigger areas. Look for that guide too.
Go make your own heaters. Share warmth with those in need.
Caring for others is hot, actually.
Updated December 2021 - Email: HeaterBloc@Gmail.com - Twitter: @HeaterBloc
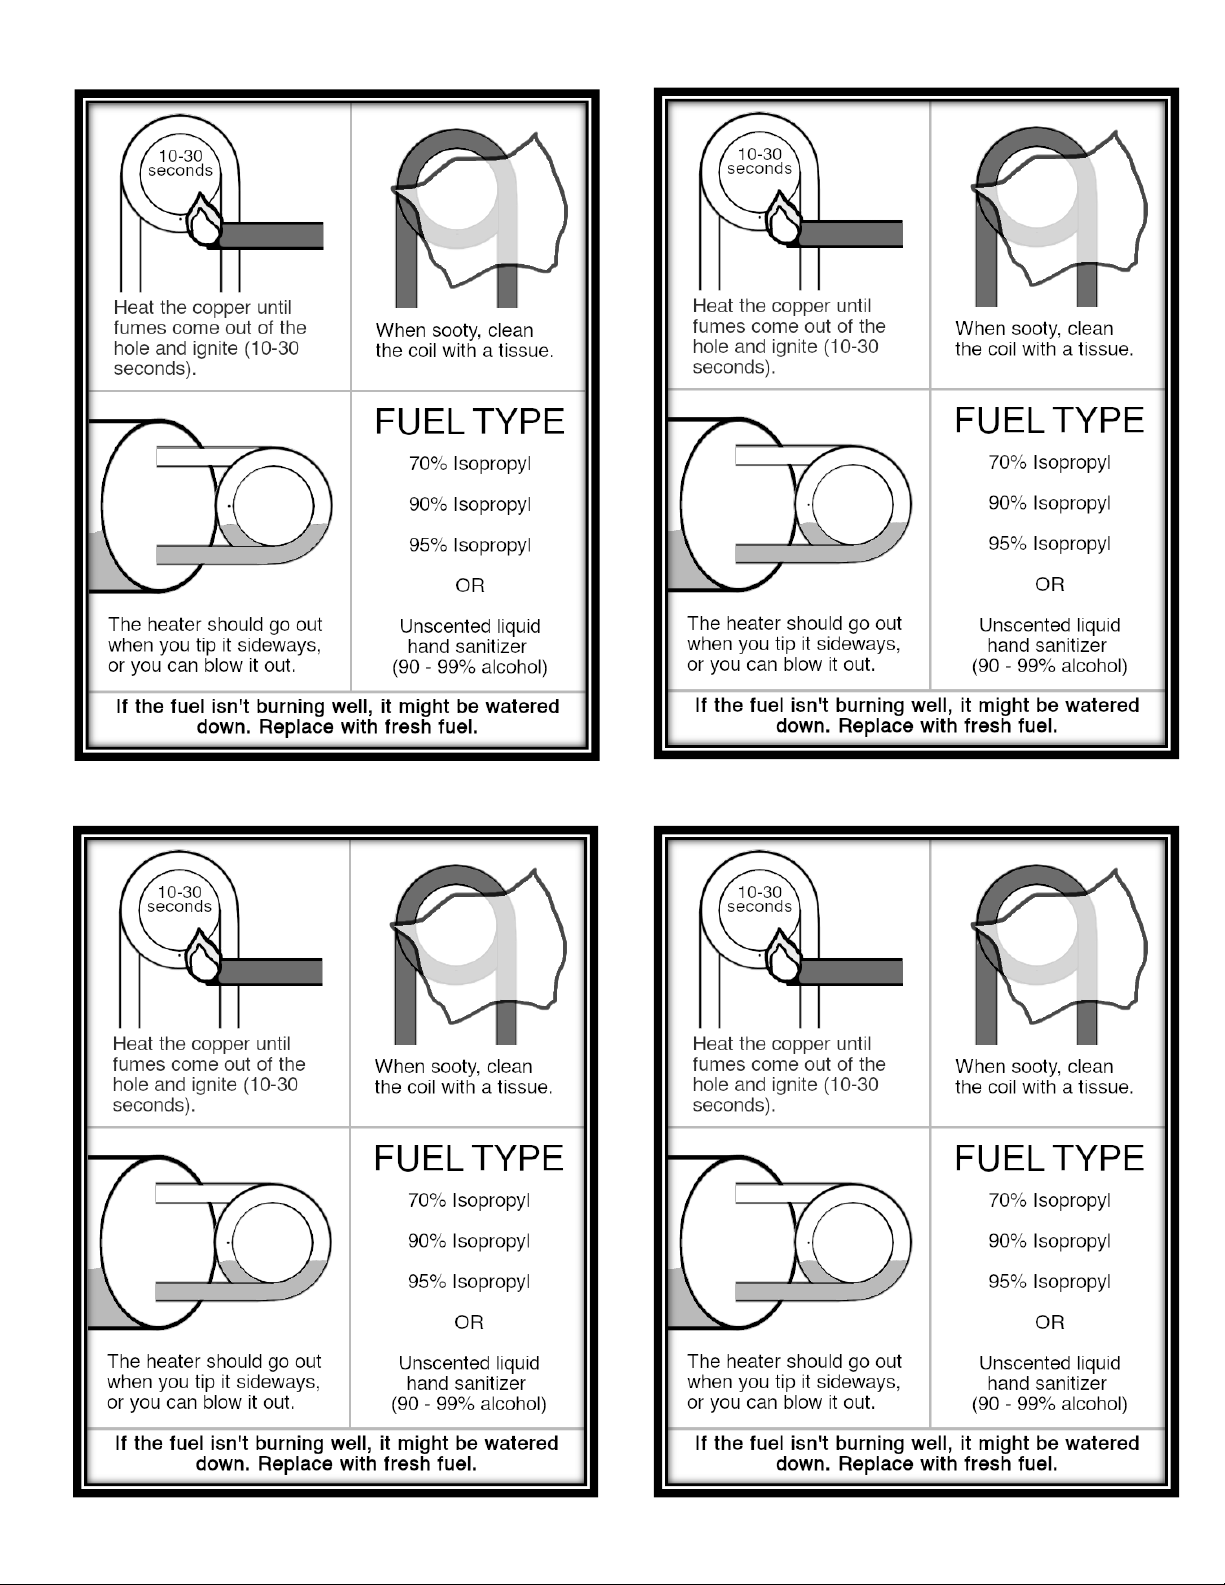
20
Print these out and cut them into little fliers to distribute with heaters.
